- Custom Variable Structure
- Best Practices for Data and Custom Variables
- Advanced Usage
- Target App Campaigns to Custom Variables
- Using Custom Variables in Web Buttons and Campaigns
- Allowed Values for Custom Variables
- Targeting Campaigns Based on Custom Variables
- Adding Custom Variables to Full Screen Survey Campaigns
- Targeting Visitors Based on Previous Page
- Adding Custom Variables to In-Page Surveys
- Adding Custom Variables to Embedded Email Forms
GetFeedback
Custom Variables
- Custom Variable Structure
- Best Practices for Data and Custom Variables
- Advanced Usage
- Target App Campaigns to Custom Variables
- Using Custom Variables in Web Buttons and Campaigns
- Allowed Values for Custom Variables
- Targeting Campaigns Based on Custom Variables
- Adding Custom Variables to Full Screen Survey Campaigns
- Targeting Visitors Based on Previous Page
- Adding Custom Variables to In-Page Surveys
- Adding Custom Variables to Embedded Email Forms
In most cases, it’s best to connect respondent feedback to information that you have available elsewhere as much as possible. You can add custom variables to your surveys to track specific data about your respondents, such as their subscription type, previous page, and more.
Custom variables are pieces of data that you can include when someone leaves feedback through a button or campaign. They can derive from other 3rd party tools or from your own website. Custom variables are used to add extra information about your respondents or the website, email, or mobile app respondents left feedback about.
Connecting feedback to data from other sources helps you to:
- Add context to your feedback
- Quantify your feedback
- Use feedback to understand your quantitative data
You can also use custom variables to accurately target people with your survey. For example, you can use custom variables to survey people between 25 and 40 years old and have purchased a specific product in the past.
You can add custom variables to web, app, and email widget forms. However, the implementation, display, and analysis options differ for each form type.
Custom Variable Structure
Custom variables are structured in key-value pairs. The variable key is the name of the variable and is matched with a value. The following list shows examples of custom variable structures:
- Subscription: Enterprise
- Tier: Gold
- Current_shopping_basket_value: €49.95
- Previous page: https://www.google.com
Once implemented, custom variables will be available in app.usabilla.com for each feedback item to which they were added. GetFeedback only stores custom variables when someone submits a response.
Custom variables allow you to enrich your feedback with data from other sources by passing these on data along with the feedback item. This means that you can add extra information such as usernames, customer types or A/B test variables to your feedback. Having these data in the same place as your feedback, will help you to connect the dots and analyze your feedback quicker and more extensively.
Best Practices for Data and Custom Variables
Custom variables can include any sort of data, provided that:
- You already collected these data
- The data is available for GetFeedback
- Your company's privacy policies allow you to send this data to GetFeedback
It’s best to only send data to GetFeedback if you are actually planning to use it. This will help you to keep your feedback clean and help you meet data privacy requirements such as the General Data Protection Regulation (GDPR).
To help you analyze data later, it’s best to keep the custom variables short and comprehensive. Keep in mind that custom variables can be used to filter and categorize your feedback.
Advanced Usage
You can also use custom variables for more specific use cases. Some examples of advanced usage are listed below:
- Connecting GetFeedback and your data layer.
- Creating a survey for respondents that come from a specific page.
- Collect feedback on your Zendesk customer support emails and connect it directly to the support agent in question.
Target App Campaigns to Custom Variables
Custom variables add extra information about your respondent or the application. You can also use them to target a specific group of visitors with your app campaign.
You can target based on multiple custom variables at the same time. These work based on AND logic, so all custom variables have to match to trigger the campaign.
For example, you could target the following custom variables:
- user ID
- email address
- subscription type
- shopping cart value
- whether the user is logged in or not
To use custom variables to target your app campaign:
Learn more about creating app campaigns
Using Custom Variables in Web Buttons and Campaigns
Add custom variables to web feedback buttons and campaigns to collect specific data with feedback items and campaign results.
Define the data you want to pass to GetFeedback
Examples of Custom Variables are user names, session IDs, A/B-testing variables from other tools, demographic data, and membership statuses.
Include the variables with a JavaScript API call
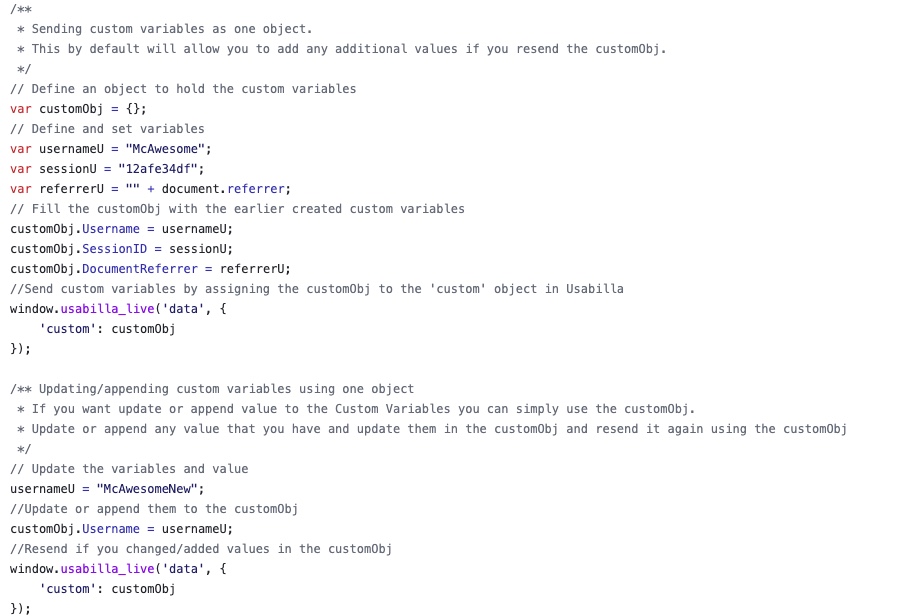
The following JavaScript API call can be included on every page on which you would like to include Custom Variables. Please ensure the call is installed on every page below the GetFeedback Digital code.

In this example, Username and SessionID are the custom variable names that will appear in GetFeedback, while the values indicate a reference to the variable.
Append and Update Custom Variables
To make it easier to update custom variables, use a JavaScript Object to store the custom variables. If you update the object and resend the custom variables using the JavaScript object, you can easily keep custom variables up to date or even append values. The code sample below shows how you might accomplish this.
Salesforce and Custom Variables
If you use our Salesforce integration and want to push custom variables into your Salesforce environment, you will need to use one of the predefined custom variable field names instead of defining your own. There are a total of 5 predefined field names for variables in the Salesforce app. Learn more
Example: You want to send the Username and Session ID variables to Salesforce. To make these variables available in Salesforce, your code should use one the predefined variable field names like this:

Allowed Values for Custom Variables
When you use our JavaScript API call to send custom variables to GetFeedback, you can pass on the following 2 objects:
- email: The respondent’s email address. If your button asks respondents for their email address, the field will be pre-filled with the data you set here. Otherwise, the email address will be sent as is.
- custom: A JavaScript object containing custom data. The data types listed below can be used in custom variables.
- Boolean
- Integer
- Float
- Double
- String (up to 500 characters)
- Array
- NULL
- Object
Arrays and objects can have a maximum depth of 2 and must consist of uniform values (only strings, only integers etc.).
The custom variables will now be included in every feedback item and campaign result. Also, you can use the custom variables to target campaigns to specific visitors.
Targeting Campaigns Based on Custom Variables
Once you set up your custom variables, you can target campaigns based on the custom variables. For example, if your users have individual profiles on your website, you can set a campaign to trigger based on profile variables such as age, gender, or membership status.
To target custom variables in a campaign:
- If you haven’t already, set up custom variables on each page you’re displaying your campaign.
- Create or edit your campaign.
- Once you reach the User Targeting step, choose to Show your campaign to certain visitors.
- Toggle on the option to use a Custom JavaScript Value Trigger.
- Add any variables you want that match the ones that are being called by the JavaScript already on the webpage.
- Once you've set your targeting options, save the campaign and connect it to the page's button. Your campaign will now show when these conditions are met.
Adding Custom Variables to Full Screen Survey Campaigns
You can add your own custom variables to full survey campaign links. These custom variables can be whatever you want them to be. For example, you can specify the campaign you’ve added the variable to.
To add custom variables to your full screen campaign:
- Copy the URL for your full screen campaign of your choice.
Example: http://survey.usabilla.com/live/s/51fa4e6706a1ea6b73000001 - Add to this URL the variables you would like to collect, as specified in the example below.
Example: http://survey.usabilla.com/live/s/51fa4e6706a1ea6b73000001?source=twitter - To add multiple custom variables, add an & between the variables.
Example:

Once a respondent completes the survey, the variables are stored in an extra column in the campaign results.
Targeting Visitors Based on Previous Page
Use the document.referrer custom variable to target visitors based on their previous page. This targeting option can be useful in many ways, as shown in the examples below:
- If someone is in the booking flow but navigates to another section of the website, you can ask why they left the booking flow, provide help, or offer a discount promotion code.
- If someone visits a certain page, then heads directly to the FAQ or Help Desk Page, you can ask if any information is missing on the page or ask why they visited the FAQ page.
- If your user takes an alternative journey, you can notify them with a Recruit Participants campaign and help redirect them to the right path.
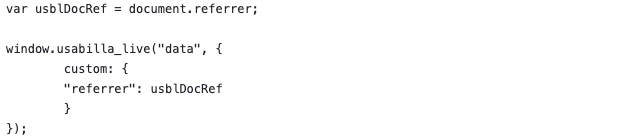
Setting Up the document.referrer Variable
Add document.referrer to your web pages as a custom variable using JavaScript. The code sample below shows how to add the variable to your page. Make sure to initialize the JavaScript after the feedback button has been loaded.
Targeting the document.referrer Variable
To target the document.referrer variable in a campaign:
- Create or edit your campaign.
- On the User targeting page, select Show your survey to certain visitors.
- Decide which page to display the campaign on. Turn on the toggle for Visitors on a particular page and add this page's URL as a target URL.
- Decide the page you want your visitor to come from (the previous page the visitor was on). This information is stored in the document.referrer variable.
- Turn on the toggle for Custom javascript value trigger. Enter the custom variable:
- For Variable, enter referrer.
- Set the condition for the rule (example: is equal to or contains).
- For Value, enter the URL or path of the page you want the visitor to come from (example: /products/).
- Select Next to schedule and save your campaign.
Adding Custom Variables to In-Page Surveys
By default, all feedback from In-Page widgets contain metadata to identify, sort, and manage your feedback. You can also collect additional information using custom variables.
To use custom variables with in-page surveys:
- Under In-Page Widgets in the left-side menu, select Setup.
- Find the widget you want to add variables to, then select the Install icon.

- Check the box to Configure custom variables.
As soon as you enable the custom variables, you can use them in your In-Page widgets. By default, we show 3 predefined custom variables: Category, Subcategory, and Item. You can use these custom variables to filter your feedback on the feedback page.
- To use a default custom variable, enter a value in one of the fields. For example, you could use Services in the Category field to track the category page you placed your in-page widget on.
- To create your own custom variable, manually enter the variable in the script using this format:
- ub-in-page-[variable name]=”[value]”
- For example, add ub-in-page-team=”marketing”

In addition to the three predefined custom variables, you can also add more custom variables by manually editing the widget code on your page. Add an additional attribute to the widget code with a predefined prefix using the format below:

In this example, the variable would be named exampleName and the value would be exampleValue.
Dynamically Add Custom Variables to In-Page Surveys
Supplement feedback from your In-Page survey with information you already have about your respondents or your website. This information can be passed to GetFeedback through custom variables so every new In-Page feedback item will include your custom variables.
To dynamically add custom variables to in-page surveys:
- Define the data you would like to pass on to GetFeedback. Examples of custom variables are: usernames, session IDs, A/B-testing variables from other tools, demographic data and membership statuses.
- Add an id attribute to your In-Page div element. Find the div element of In-Page on your website and add an id attribute to the div. This id will be used to append an attribute containing your custom variable to the div. Your div will then resemble the div below.

- Find the In-Page script on your page and add the below code. Place this code directly beneath the = In-Page script on your webpage.
- Replace in-page-id with the ID you’re using.
- Replace key with the name you would like to use in GetFeedback for your custom variable.
- Replace customVar with your custom variable.

- Test your custom variable. Leave feedback through your In-Page widget and check your variable in GetFeedback. You can filter feedback from in-page surveys using the custom variable, and the variable should be included in exports.
Adding Custom Variables to Embedded Email Forms
With app.usabilla.com, embedded email surveys can help you gather feedback on emails, such as newsletters or customer support emails. Add custom variables to email surveys to collect more info about the feedback, such as the newsletter version your respondents left feedback on or which support agent they worked with.
Static Custom Variables
Static custom variables have a predefined name and value. For example, you may add a custom variable for surveys that members in the 'Silver' tier will see. The name of your custom variable would be 'Tier,' and the value would be Silver. Static custom variables are added to all feedback submitted through the form.
Dynamic Custom Variables
Dynamic custom variables only have a predefined name; the value may be different depending on the respondent. The value uses a placeholder that can be read by the email client you're using. When someone submits feedback through the form, the custom variable value will be whatever information is supplied through the placeholder.
For example, you may send a newsletter to all of your members in different tiers. When members from the 'Gold' tier give feedback, the value of the Custom Variable will be 'Gold,' but when members from the 'Silver' tier give feedback, the value of the Custom Variable will be 'Silver'.
Adding the Variables to Email
To add custom variables to embedded email surveys:
- In app.usabilla.com, select Websites in the top left corner, then select Email.
- Select Setup.
- To create a new embedded email form, select Create new widget. Build your form as desired.
- To add variables to an existing form, find the form, then select Widget installation instructions.
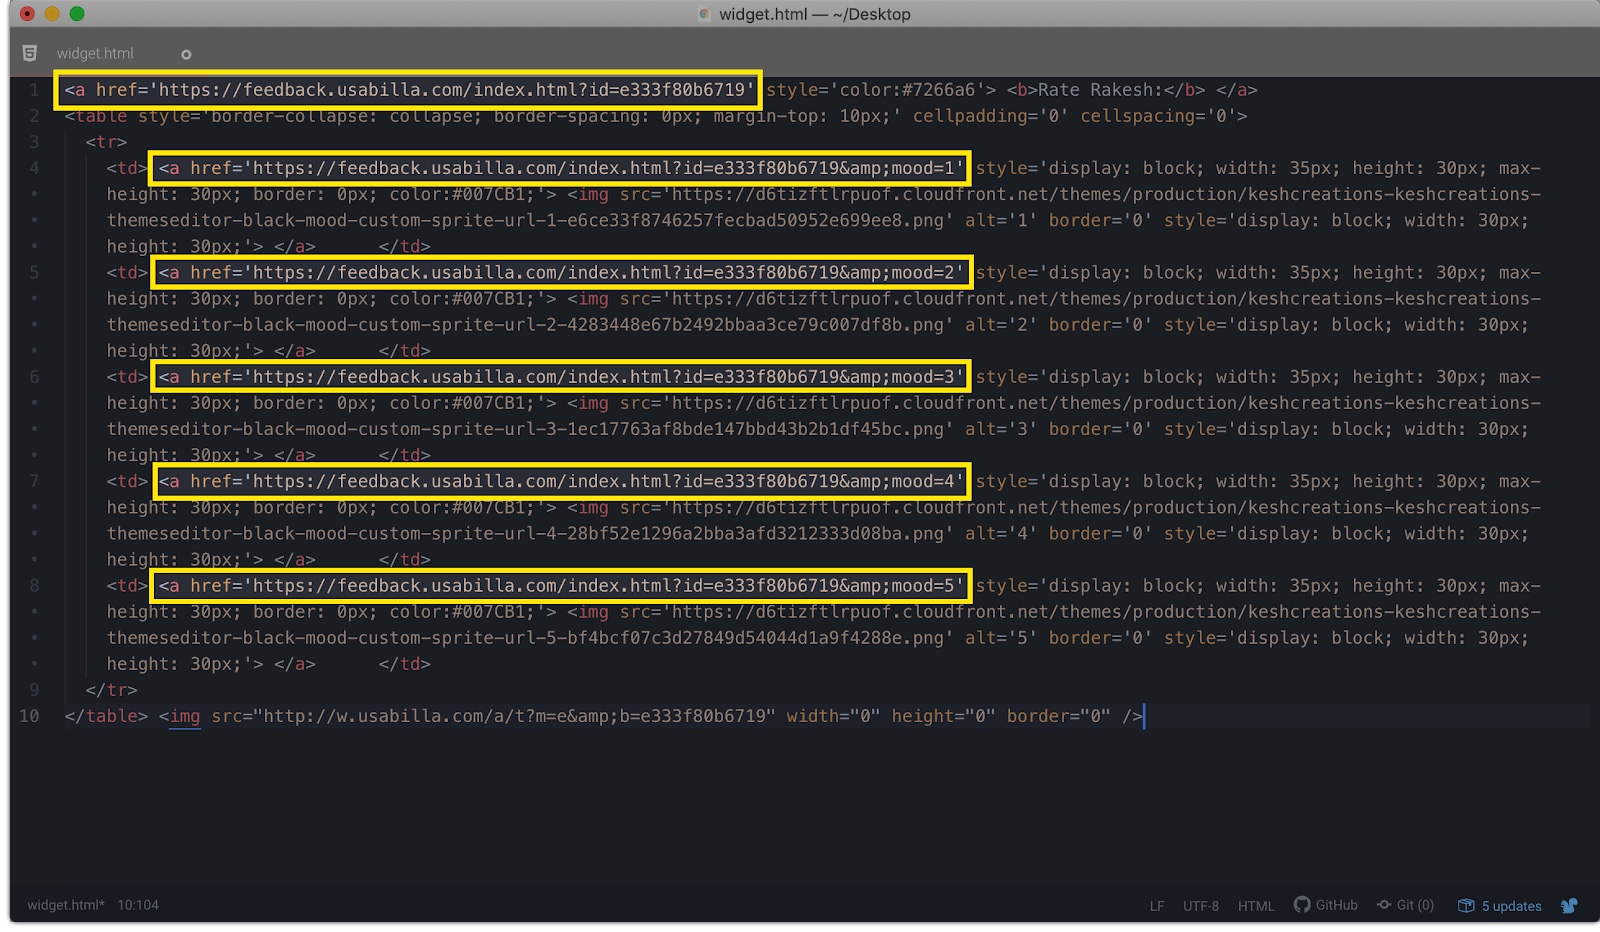
- Copy the HTML code on the right of the screen.
- Paste the HTML into a text or code editor. The code consists of hyperlinks ( tags) and images ( tags).
TIP: To make the code easier to read, save it as an .html file and run a Format or Beautify command. - Add your custom variables to each link in your widget using this format:
Salesforce and Custom Variables
If you use our Salesforce integration and want to push custom variables into your Salesforce environment, you will need to use one of the predefined custom variable field names instead of defining your own. There are a total of 5 predefined field names for variables in the Salesforce app. Learn more
Example: To make the recipient email variable available in Salesforce, your code should use one the pre-defined variable field names like this:
&integration_sf_01={{recipient.email}}