GetFeedback
Getting Started with In-App Feedback
Learn how to create your surveys and install them in your app. You’ll need help from your app’s development team.
Before You Start
You need the following to use GetFeedback with your app:
- Access to GetFeedback for Apps in your account
- Native iOS or Android app
- Minimum OS of iOS 9.0+ or Android 4.1+
Definitions
- Passive feedback: User-initiated feedback shared from within your application. Your app users can choose to leave this feedback at any time.
- Active feedback: Feedback collected using targeted in-app surveys that appear for certain users during specific moments in your mobile app. These help you gather insights at specific points in a flow.
- Form: A survey in GetFeedback for Apps.
- Campaign: A targeted survey that displays after an event happens in your app.
- Event: An action that happens in your app, such as the app crashing or someone checking out. You can target events with a Campaign to show a survey after an event happens.
- Software Development Kit (SDK): A set of tools that allows developers to set up the GetFeedback solution in a mobile app. GetFeedback has two app SDKs: one for iOS and one for Android. We also have guidance for hybrid apps.
Passive Feedback: In-App Surveys
Add surveys to your app that visitors can respond to at any time. To manage your forms:
- In app.usabilla.com, go to the top left corner below the GetFeedback logo.
- If you see Websites or Email, select the dropdown, then select Apps.
- Under In-App Forms, select Setup.
You’ll manage your GetFeedback for Apps implementation on the following pages:
- The dashboard shows you aggregated results. This page helps you to keep track of feedback at a glance. Learn more
- The feedback page holds your actual feedback items. Read your feedback, label individual items, or export your data for further analysis. Learn more
- The setup page is where you create and manage your feedback forms.
1. Implement the SDK
Have your development team implement the SDK in your app. Give them our SDK documentation so they can get started.
2. Create the Form
Build your form in GetFeedback. Add questions, set visibility and jump rules, and customize the theme.
3. Add the Form ID to the SDK
Have your development team add the Form ID to the app SDK. This allows the form to show up in the app. You only need to do this once. After this, you can edit the form at any time, and the survey will automatically update in your app.
To find the Form ID:
- In app.usabilla.com, go to In-App Forms and select Setup.
- Select the form you want.
- Copy the Form ID.
4. Edit the Form as Needed
Edit your survey at any time. Your changes automatically display in your mobile app when you save them. You don’t need to update the form ID.
Active Feedback: App Campaigns
Target app visitors to get feedback at specific moments in the user journey.
To manage your Campaigns:
- In app.usabilla.com, go to the top left corner below the GetFeedback logo.
- If you see Websites or Email, select the dropdown, then select Apps.
- Under Campaigns, select Overview.
Each Campaign has the following sections:
- A performance overview, which shows the number of views and responses for your Campaign.
- A status toggle that can activate or deactivate the campaign.
- The editor, which allows you to create or edit the survey questions or targeting options.
- The results, which include a CSV-export functionality and charts for each question in your survey.
1. Create the App in GetFeedback
The App is like a container in GetFeedback. It holds the surveys you want to show in your mobile app. You can attach a Campaign to multiple apps, and you can attach multiple Apps to a Campaign.
To create the App:
- In app.usabilla.com, go to the Apps section.
- Under Campaigns, select Overview.
- Select New Campaign.
- Select Create New App, then enter the app name.
2. Add the App ID to the SDK
Copy the App ID from the app you just created. Then, have your development team add it to the SDK.
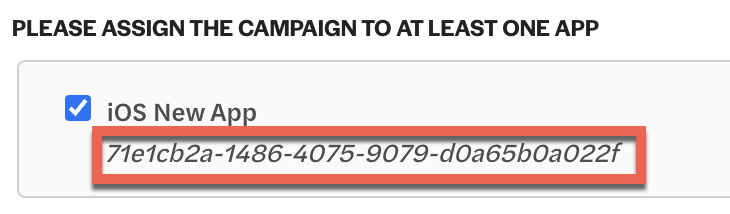
3. Create a Campaign and Attach it to Your App
Create the new Campaign in GetFeedback. Attach it to the App you created.
4. Build the Form
Create your Campaign survey. Add questions and pages, set visibility and jump rules, and customize the theme.
5. Set Up Targeting
Choose when to show your survey. You can target events so the survey displays after something happens in your app. You can use either standard or custom events.
- Standard events: Pre-implemented events for common use cases. You can use a standard event without help from your development team. There are six standard events: App launch, App closed early, App updated, App not updated, App crash, and Specific date. Learn more about standard events
- Custom events: Events that you create with your development team. You can target any event, like after users complete a purchase. Your development team will need to implement this event in your app. Then, you can use the event name in the User targeting step. Learn more about event targeting
You can also target device language, a percentage of users, and custom variables. Learn how to set up targeting in your campaign.
After setting up targeting, save your Campaign.
6. Preview Your Campaign
7. Turn the Survey On from GetFeedback
Your Campaign is turned off by default. To start showing your Campaign, go to the Campaign Overview page, then turn on the Status toggle for your Campaign.
