Apply
Manage Applications: Overview
When a program is launched and applications are collected, the applications are stored within the application management page of their respective program. This article serves as an overview of the features and actions available within the application management page.
How to Access Manage Applications
If your program has launched:
- From the site dashboard, click on the Title of the Program.
- Click on the Applications tab at the top of the page.
How to Add or Remove Columns
You may find that the table looks too busy or the information that you need is not currently displayed. You can add additional columns or remove columns from your view using the following steps.
- Select the Column icon from the top right of the application table.
- Select columns you would like to add or Remove the selection of columns you would like removed.
- Select Done.
Applying Filters
You have the ability to filter your applications to make it easier to navigate and search for specific applications within your program. See How to Filter Applications for more details on available application filters.

Finding an Application
The search bar located in the top right-hand corner of the table will allow you to search for an application based on the title of the application or the applicant's username. This search function will display all results that contain the search term or character combination that has been provided. As expected, the more precise the search term is the more accurate the results will be. See How to Search for Applications for more information.

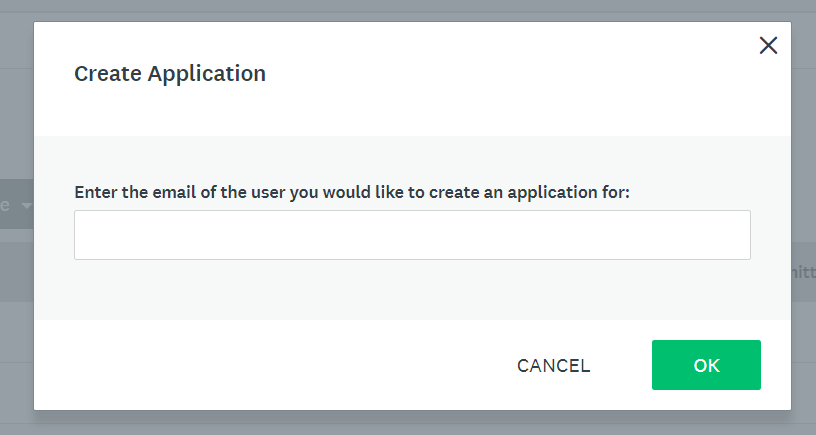
Create Applications for Applicants
Applications can be created by administrators for applicants from Manage Applications as well. This is done individually meaning that one application can be created for a single user at a time. Furthermore, applications can only be created for one user at a time.
To create an application for a user:
- Go to Manage Applications.
- Select Create Application.
- Enter the email address of the applicant you are creating the application for. The email address will need to be added as an Applicant to the site prior to creating the application.
- Click OK.
Application Management Actions
Below you will find a complete list of actions that can be carried out by administrators with access to the application management table. For more information on any of these actions please select the respective link:
- Create Application
- Send Email to Applicants
- Download applications
- Mark an Application as Awarded/ Declined
- Submit an Application
- Lock/Unlock an Application
- Archive an Application
- Move an Application to Trash
- Restore an Archived Application
- Restore a Trashed Application
- Move Applications Between Stages
- Add Labels to an Application
- Remove Labels from an Application