GetFeedback
Targeting Options for Web Campaigns
Learn more about the different targeting options for your web campaigns.
Targeting Campaigns to Specific Users
Web Campaigns can target specific users. Use any of the following targeting options to ensure that your campaign will show to the right users at the right time. They can be found in the step 2 of your campaign editor and are available for all campaign types. Simply enable each targeting option and fill in the details to use it.
Visitors on a Specific Page
Show your campaign to specific visitors by defining the URL(s) on which your campaign should show or should not show.
Define whether you'd like to use the page's path or full URL. Select "full URL" if you'd only like to target anything up to and including your top-level domain (for instance ".com" or ".nl"). Otherwise, select "Path".
Whenever your target URL contains a question mark or hash-sign ("?" or "#"), it's important to select the first checkbox. If you would like to show your survey on all URL excluding the target URL, select the second checkbox. Learn more about URL and Path Targeting
Next, choose the condition. The available conditions are "contains", "starts with", "ends with", "match exactly" or "matches regular expression". Generally speaking, the first options should suffice. If you have a very specific needs for targeting you can also use targeting based on regular expressions (Regex).
Regular expressions are widely used in programming and analytics tools. They offer a lot of flexibility in your targeting.
Show a Campaign After X Amount of Seconds on a Page
Show the campaign to visitors who are on a page for a certain amount of time. You can show a survey after a few seconds, but you can also set the survey to appear a bit later. In the latter case, we recommend you to check your Analytics suite for the average amount of time your users spend on certain pages. This will allow you to target near the middle or end of their page visits.
Please note that the amount of seconds always works on a page level.
Visitors Potentially Exiting the Website
This will trigger visitors who move with their mouse pointer outside the active browser window after the defined time. Moving outside the active browser window potentially could mean visitors would like to exit the website/browser tab.
Returning / New Visitors
Target visitors who are new on your site or only visitors who return to your site. By not enabling this targeting rule you will target both new and returning visitors.
Visitor Percentage
Target only a percentage of your visitors.
Website Scrolling
Trigger the campaign when a user has reached the bottom of the site when scrolling down. You can set the number of pixels from the bottom when it should be triggered.
Pages Visited
Set the number of pages the visitor at least needs to have visited before the campaign is triggered.
[Advanced] Manual Targeting with Javascript
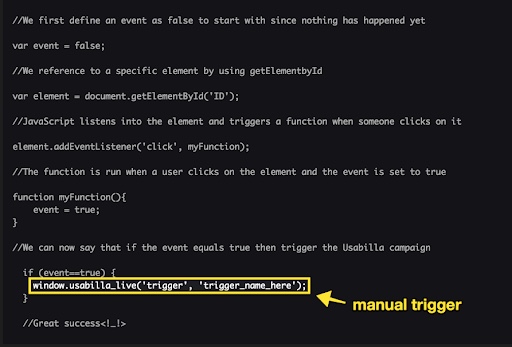
Campaigns can also be triggered manually. This requires technical knowledge and access to the production website code or a tag management system. Every campaign can be triggered with it's unique trigger name. Set then name in the campaign editor and then copy the javascript snippet that appears. Add the javascript snippet to your website code in order to trigger the campaign in question.
window.usabilla_live("trigger", "campaign-name");
An example of when the manual trigger comes in handy is when wanting to show the campaign to a user on a button click.
Targeting Cookies
To target specific cookies:
- Turn on the Visitors who have a specific browser cookie option.
- Type in the name of the cookie.
- Choose how you want it to relate it to the browser from the drop-down menu.
- To make the cookie case insensitive, check the box under the Cookie name field.
- To add another cookie, select Add. Another box will appear directly underneath. This will also reveal two trash can icons, which you can use to remove a cookie.
Cookies are widely used to set dependencies between different campaigns. A detailed explanation is available here.
Targeting Specific Devices
Specify which devices you wish to target with your campaign. The three options are Mobile, Tablet, and Desktop. The mobile and tablet options have several sub-categories to allow you to be more specific with the devices you wish to target. For example, you can target Android devices only, rather than all mobile devices.
Targeting URLs and Paths
When targeting users on a specific page, you can target either the full URL or the path. There are a few things to keep in mind when using these options.
URL Structure
An URL is made up out of multiple parts, with each part having its own purpose. For understanding how targeting works in GetFeedback Digital it's important to know which parts are used for targeting. The image below contains annotations with the parts being differentiated by color.

Using a Path
Any targeting that you set based on the path will only trigger based on path string, which are the characters that are located just after the TLD. The protocol, subdomain, domain, and TLD will therefore not be taken into account when the targeting is set to "path".
For example, if you target based on the path containing "Usabilla" while using the URL https://support.usabilla.com, the campaign won't trigger. This is because the string "Usabilla" is part of the domain, not the path. Using Full URL targeting instead will trigger the campaign.
When you want to be sure, it's best to set the targeting based on specific pages on the "Full URL" option with a contain.
Include Query Part in URL (everything after the ? or #)
Many webpage links contain a query. A query can be used to further specify the request that you're making to the web server. For example, the URL below with query tells the web server that we want to access the "https://support.usabilla.com/hc/en-us/search" page with a query:
| https://support.usabilla.com/hc/en-us/search?utf8=%E2%9C%93&query=test |
In this example, the query is "?utf8=%E2%9C%93&query=test" which specifies that we're searching for the keyword "test."
Most queries have 2 parts: the query string (which comes after a ? in a URL) and the fragment identifier (which comes after a # in a URL).
- The Query String is the part of the URL that's passed to the server-side program normally after a "?" and up to but excluding the # if any.
- The Fragment is the part of the URL that is used as an identifier. The interpretation is up to the user agent, though it's common practice that it's the anchor of a tag to which the browser is asked to position itself.
If you check the box to Include query part in URL, include the whole the query string and fragment for targeting a campaign.
Invert (exclude pages that match)
Use the Invert option to show your campaign on all pages except for some. The Invert option allows you to prevent your campaign from showing on certain pages based on URL or Path where. This can be very helpful in website-wide NPS campaigns that you want to exclude from login pages or checkout flows.
Targeting Using Manual Triggers
GetFeedback uses multiple options such as time or position on page to load your campaigns. However, using a small snippet of code, you can create campaigns that trigger when or wherever you want.
Common use cases include loading a campaign when a visitor clicks on a link or a button on your website. It’s also possible to install a trigger multiple times on a webpage to trigger the same (or different) campaigns.
Setting up a Trigger
There are 2 parts to using a manual trigger:
- Creating the manual trigger itself in your GetFeedback account.
- Implementing this piece of code on your website as part of the event you want to use.
Creating the Manual Trigger
- Go to your GetFeedback account and go to Websites > Campaigns > Overview.
- Select your campaign and select Edit.
- Under User targeting, select Show your survey to certain visitors.
- Choose the Manual trigger (with JavaScript) option.
- Enable the Manual trigger by clicking the toggle on the upper left of the modal that appears.
- Name your trigger.
- Select Save.
Installing the Manual Trigger on your Website
Now that you’ve created a manual trigger, you’ll need to install it on your website using a JavaScript event. The manual trigger will be used to communicate with GetFeedback that a specific campaign needs to be shown.
Installing a manual trigger requires knowledge of JavaScript events and access to your website’s code or a tag management system. Add the javascript snippet below to your website code, replacing “campaign-name” with the name of your manual trigger.
window.usabilla_live("trigger", "campaign-name");
Example
Do's and don'ts for manual triggers
- Do use unique manual trigger names.
- Don’t trigger multiple campaigns at once.
- Don't use campaigns that trigger repeatedly.
Campaign Scheduling
Appeal to your users at certain times or specific days and turn your campaign off as soon as you reached the desired number of participants. This means that once you launch a survey, you will no longer have to worry about turning it on or off.
To set up campaign scheduling:
- Create a web campaign, or edit an existing campaign.
- On the Scheduling page, enable any of the scheduling options:
- Activate campaign now
- Manually activate later The campaign will be stored as off and you can activate it later
- Activate campaign on [date/time]
- Deactivate on [date/time]
- Deactivate after [ an X no. of responses]
- Reset campaign [after X days, weeks, months, years]. Users can see the campaign a second time when after every reset.
- Do not bother visitors more than once until reset
- After scheduling your campaign, select Save.
Using Local Storage for Campaign Scheduling
If you use the scheduling option Do not bother visitors more than once, visitors won't see the campaign more than once, regardless of their interaction with the form using Local Storage, until the campaign is reset. The Local Storage is also used for tracking if a customer has already filled out campaign or opted-out.
The diagram illustrates how GetFeedback determines whether to show a campaign to a visitor.
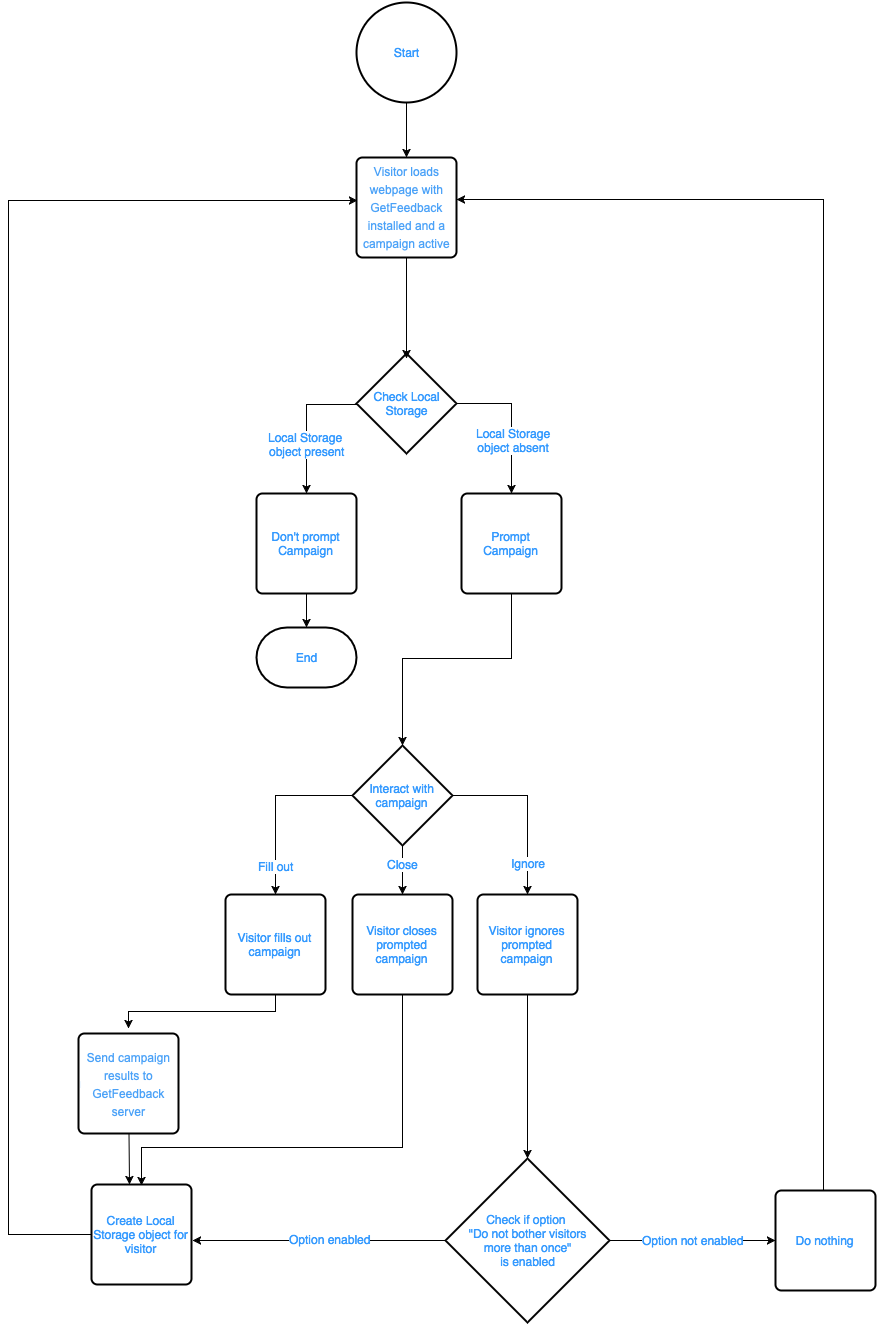
GetFeedback uses a Local Storage object to determine if a campaign should be shown. The Do not bother visitors more than once option makes sure that a Local Storage object is created even if the visitor doesn't interact with the prompted campaign.
Background Information
Local Storage objects are stored locally for using the web page.
Local Storage objects are similar to cookies in the sense that they both store data. However, cookies are primarily for reading server-side; local storage can only be read client-side. Local Storage objects store data with no expiration date and get cleared through JavaScript or clearing the Browser Cache / Locally Stored Data. In contrast, a cookie can expire.
Clearing your cache makes the campaign prompt again since Local Storage objects will be deleted. Reset your campaign in the campaign settings to make sure the campaign checks for a different Local Storage object. Local Storage objects aren't persistent across devices and don't track the visitor over multiple domains.
Managing Dependencies Between Campaigns
If you are running multiple GetFeedback Digital campaigns on your website, it is important to think about the way in which you would like those campaigns to behave in regard to one another. Sometimes you will want to only show a campaign to a user if they have seen or answered another campaign before. At other times you will just want to make sure that a user who answered your campaign, does not see another one.
You can implement an extra JavaScript snippet which adds a cookie in the user's browser. This cookie will tell you whether or not a user has encountered a GetFeedback campaign before and allows you to target other campaigns accordingly.
1. Decide when to drop the cookie
We add dependencies between campaigns using our Event Callback feature. You can use a cookie to influence the behavior of your campaigns. This cookie can be placed in four distinctive moments:
- A campaign is displayed to the user, by using the event action "Campaign:Open".
- When a user navigates to the next page in your campaign, by using the event "Campaign:Page Switch"
- When a campaign has been completed, by using the event action "Campaign:Success"
- When a campaign has been closed, but not completed, by using the event action "Campaign:Close"
Decide when you would like to add the cookie. Remember the corresponding event action in order to proceed to the next step.
2. Specify the event action and desired cookie name
Once you have decided on which event action you would like to add the cookie, adjust the javascript snippet that needs to be added to the GetFeedback base code. The code that we will be editing is the following:
