GetFeedback
Masking Personal Data
Personally Identifiable Information (PII) is data left by a respondent that can be used to identify them. PII can include a person’s full name, address, and more.
- Feedback buttons and data storage: You can store certain information when someone submits feedback, including an email address, location, or IP address. If you don't need this data, it's best to stop collecting it. You can turn off certain data storage in your button settings.
- Screenshots and PII: When someone submits feedback through a web button, we capture a screenshot of the page they left feedback on. Sometimes, this screenshot can include sensitive information, such as a respondent's account details or bank information. You can mask certain elements in screenshots or stop saving screenshots completely.
- Text Fields and PII: You can include open text fields in your forms and campaigns. However, respondents aren't restricted from entering personal data in these fields. To make sure this information is not sent to GetFeedback, you can mask PII sent through Text Input and Text Area fields.
Before You Start
You’ll need a few things to start masking personal information:
- A passive feedback form or active campaign with an open text field (a Text Input or a Text Area element)
- For web buttons and campaigns: A web developer who can implement the code on your website
- For app forms and campaigns:
- A mobile developer who can implement the code in your app
- GetFeedback Apps SDK 6.2.0 and above
Privacy Settings for Web Forms and Screenshots
Hide certain personal information from our servers and respondent screenshots, such as identities or bank details.
To access your web button’s privacy settings:
- In app.usabilla.com, go to Buttons & Forms, then select Setup.
- Find your web button, then select Options > Edit Button.
- Scroll to the bottom and select Advanced settings.
General Privacy Settings
Determine what kind of data to store when someone submits feedback.
- Save form values: Store information like names, addresses, emails, and phone numbers. Password field contents are never stored. To avoid storing this data, uncheck the box.
- Generate a full-page screenshot for every feedback item: Save an additional full-page screenshot when someone submits specific feedback to your web button. If you don't want to save additional screenshots, uncheck the box.
To stop saving any screenshots, edit your feedback button and select No visual feedback. Learn more - Store IP address: Save the respondent’s IP address when they submit feedback. If you store the IP address, you can find feedback sent from the same internet connection. To avoid storing this data, uncheck the box.
- Store user’s location: Save the respondent’s location when they submit feedback. To avoid storing this data, uncheck the box.
Advanced Privacy Settings for Screenshots
You can mask elements, text, and attributes in screenshots. You'll need basic HTML and CSS knowledge.
There are 3 types of masking you can set up:
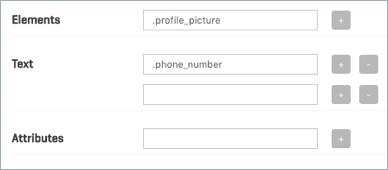
- Elements: Replace the entire element with a black box in the screenshot.
- Text: Show the element, but make all text in this element unreadable in the screenshot.
- Attributes: Remove identifiable attributes from the HTML of the screenshot. This won’t affect how the screenshot looks.
Masking Individual Elements
If you only have 1 element or want to define several individual elements, you can use the element ID or element selector to mask data.
To use an element ID to mask elements:
- Get the element ID from your website:
- On your webpage, right-click the element, then select Inspect or Inspect Element.
- The web development tools display on your screen with the element highlighted.
- Copy the ID. In this example, the element ID is home-block_howto.
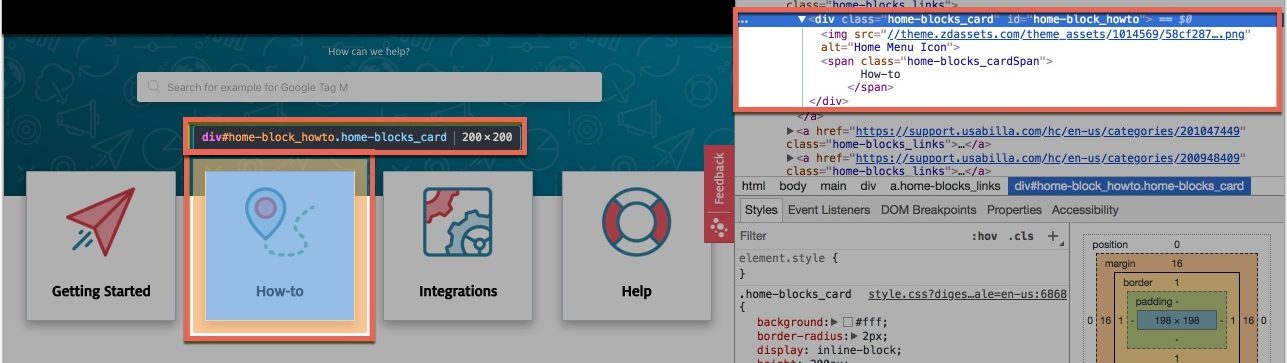
- In your button’s Advanced settings, enter a #, then paste the element ID in the fields based on the type of masking you want.

If the element you want to mask doesn’t have a specified ID, you can use the selector instead. To use the selector:
- Copy the selector from your site:
- On your webpage, right click the element, then select Inspect or Inspect Element.
- The web development tools display on your screen with the element highlighted.
- In the development tools, right-click the highlighted element, then select Copy > Copy selector.
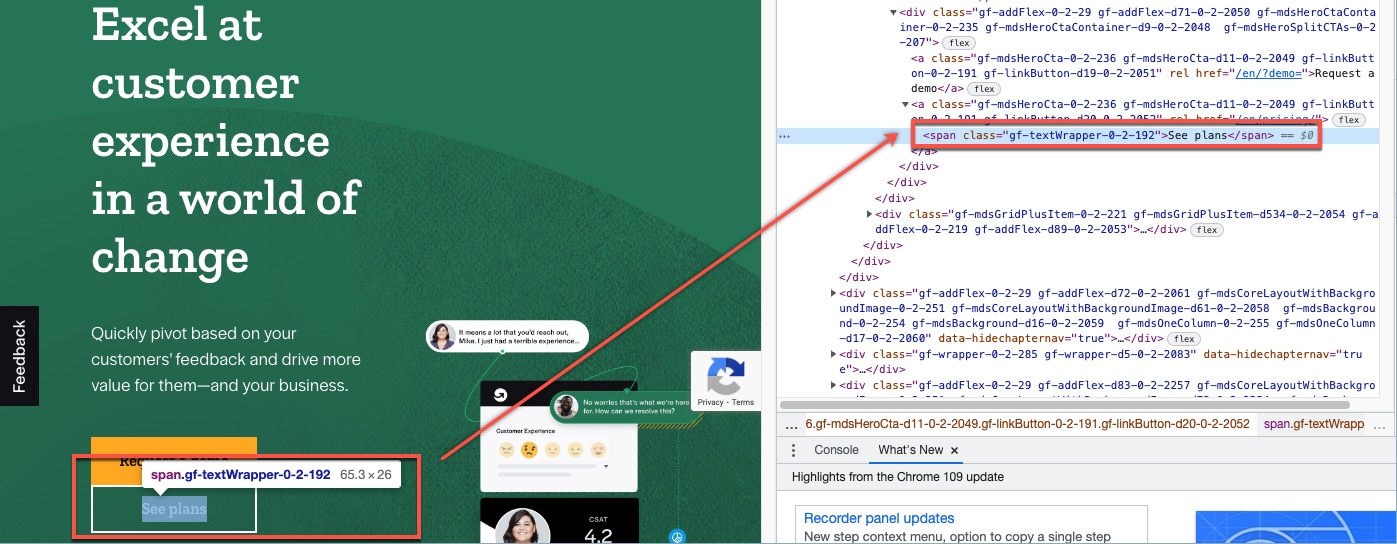
- In your button’s Advanced settings, paste the selector in the fields based on the type of masking you want.
Masking Several Elements by Class
If you have several elements under the same class name, define masking for all of them by using the class name.
In your button’s Advanced settings, enter a full stop ( . ), then paste the class name.
Masking Text Fields (Web Buttons)
To use the Data Masking feature in GetFeedback for Web, you'll need to enable it with a JavaScript command. The easiest way to do this is by adding the setDataMasking JavaScript command below to your Button Code.
window.usabilla_live("setDataMasking");
Advanced Field Masking: The Regular Expression (RegEx)
Mask personally identifiable information (PII) in open text fields, by including a set of regexes. By default, GetFeedback for Web provides you with regexes for email addresses and numbers with 4 digits or more. You can add custom regex as well.
Web Forms: Using RegEx to Mask Text Fields
To use data masking with regular expressions, create a JS snippet with a variable called masks containing an array of regex patterns. Then, set the array as an argument to the setDataMasking command.
When the DataMasking feature finds a match, the matching data will be masked with 'X's. This masking happens in the visitor’s browser before that data is sent to the server. This ensures PII data is not transmitted with the feedback you collect.
RegEx Code for Web
Here is an example of how to use RegEx expressions for data masking. This example shows how to mask Dutch zip codes that have 4 numbers and 2 letters.

App Forms: Using RegEx to Mask Text Fields
This RegEx will mask any matched content in open text fields in your forms and campaigns. By default, the GetFeedback App SDK provides you with RegExes for email addresses and numbers with 4 digits and more.
You can include your own RegEx as well. For example, you can create a RegEx to mask Dutch zip codes that consist of 4 numbers and two letters. Once you create your custom RegEx, implement it in the SDK. It's also possible to include multiple RegExes.
PII will be masked with a character you can define yourself. By default, the matched content will be masked with 'X's. However, you can mask content with '#'s, '*'s, or any other character. Make sure to define this character in the SDK.
The examples below show the code we have created for the masking feature.
RegEx Code
The RegEx part is identified below in bold:
- iOS: Usabilla.setDataMasking(masks: [String]), maskCharacter: Character)
- Android: Usabilla.setDataMasking(List<string> masks, char maskCharacter);
Masking Character
The character used to mask the matched content is identified below in bold:
- iOS: Usabilla.setDataMasking(masks: [String]), maskCharacter: Character)
- Android: Usabilla.setDataMasking(List<string> masks, char maskCharacter);
Implementing RegEx in Apps
The full code to mask PII is included on our Github pages. Share these links with your developers so they can implement data masking in your app.