- If you would like to integrate multiple buttons, repeat these steps for each button.
- Integrating with Google Analytics
- Enabling the Integration Using gtag.js
- Send Events to all Google Analytics Tracking Codes
- Send Events to One Tracking Code
- Adding Data to a Custom Analytics Report
- Google Analytics Events
- Google Analytics Feedback
- Integrating GetFeedback with Google Analytics using GTM
GetFeedback
Google Analytics Integration
- If you would like to integrate multiple buttons, repeat these steps for each button.
- Integrating with Google Analytics
- Enabling the Integration Using gtag.js
- Send Events to all Google Analytics Tracking Codes
- Send Events to One Tracking Code
- Adding Data to a Custom Analytics Report
- Google Analytics Events
- Google Analytics Feedback
- Integrating GetFeedback with Google Analytics using GTM
Web analytics help identify which pages of your site are converting. You can combine Google Analytics data with GetFeedback to:
- Get a thorough understanding of “the why” behind your quantitative analytics
- Measure feedback and campaign events directly from your analytics tool
- Create custom reports to show exactly how your visitors are interacting with GetFeedback for Web
- Improve your understanding of where to direct your optimization efforts
Integrating with Google Analytics 4
If you used the Google Analytics integration before migrating to Google Analytics 4, set up this integration for your button. You don't need to change the original integration settings.
To integrate with Google Analytics 4:
- Make sure both Google Analytics and GetFeedback for Web and App for Web are set up on your website.
- In app.usabilla.com, select your username in the bottom left, then select Account Settings.
- Select the Integrations tab.
- Select the Google Analytics 4 logo.
- Select which button you would like to create the Google Analytics integration for, using the Button dropdown.
- Customize the event category, if needed. By default, this is "Usabilla Live". Event category can be used to create a custom report in Google Analytics.
- Check the Enable box to start using the integration when you save it.
- Select Save to add the integration.
If you would like to integrate multiple buttons, repeat these steps for each button.
Integrating with Google Analytics
The legacy Google Analytics integration works with Universal Analytics, which was sunset in July 2023. If you've migrated to Google Analytics 4, make sure to use the Google Analytics 4 integration instead
- Integrate with Universal Analytics
Universal Analytics for Google Tag Manager
If you’re using Universal Analytics Tag in Google Tag Manager, you'll need to change is the field for the "Tracker Name." Changing this setting allows GetFeedback for Web and App to set the tracker name.
Follow these steps to change the setting:
- Log in to Google Tag Manager.
- Go to your Google Analytics - Universal Analytics Tag.
- Select Edit.
- Select More Settings > Advanced Configuration. In the field Set Tracker Name, set the value to True. Leave the field "Tracker Name" blank.

Save and submit your settings, then exit.
Enabling the Integration Using gtag.js
To use our Google Analytics integration with a gtag.js tracking code, you’ll need to add a code snippet to your webpage instead of enabling the integration in your GetFeedback account.
To push GetFeedback data using the Global analytics tag, copy and paste the following code snippet below the GetFeedback button code on your website:
If your implementation is more complex and you work with multiple tracking codes or if you implemented Google Analytics through a Tag Management System, the steps above might not work for you.
In these cases, to manage the tracking code, disable the integration in your GetFeedback account and then insert one of the below JavaScript snippets on your website below your GetFeedback for Web code.
Send Events to all Google Analytics Tracking Codes
If you’re using multiple Google Analytics tracking codes or don’t know the name of your tracking code, use the snippet below. If a user provides feedback through your GetFeedback campaign, events will be pushed out to all tracking codes running on the website.
Send Events to One Tracking Code
If you’re using multiple Google Analytics tracking codes, and need to send your events to a specific tracking code, use the JavaScript snippet below.
Replace trackerName with the name of your tracking code and add the snippet to your site, below your existing GetFeedback code. When a user leaves feedback through GetFeedback, event data will be sent to your tracking code.
Finding the Name of Your Tracking Code
Your tracking code’s name is set up by your dev team, usually in Google Analytics or your tag manager. Learn more about tracker names here.
There are browser extensions like Google Analytics Debugger for Chrome that can help you find the name of your tracking code.
Adding Data to a Custom Analytics Report
We will now look into setting up a custom report, to display the GetFeedback for Web and App data within Google Analytics.
- First, log in to your Google Analytics account.
- Go to Customization > + New custom report.
- Enter a title for your custom report and enter a name for your report tab.
- Add the following four metrics: visitors, Unique Events, Pages / Session, and Avg. Value.
- Add the following Dimension drill-downs: Event category, Event action, Page, and Event label.
- Select Save and your report should be ready.
Google Analytics Events
The following actions are available to indicate how a visitor interacted with GetFeedback for Web and App on your website.
| Event Name | Description |
| Feedback: Open | Fires every time someone clicks the feedback button. |
| Feedback: Success | Fhis event fires every time a visitor completes the feedback process. |
| Campaign: Open | Fires when a visitor opens a campaign. |
| Campaign: Close | Fires when a visitor clicks the close button of a campaign. |
| Campaign: Success | Fires when the user submits their campaign responses on the last page of the campaign, clicks the redirect button of a Recruit Participants survey or when the user provides feedback while a Boost live feedback campaign is active. |
| Campaign: Feedback Clicked | Fires when the user clicks the call to action button in a Boost live Feedback campaign. The "Feedback:Open" event is also fired. |
| Campaign: Page Switch | Fires whenever the visitor clicks the next page in a campaign survey. This event also fires when a visitor clicks the submit button. |
Google Analytics Feedback
Below you’ll find the information sent with each event and how they map to different variables.
Feedback button:
- Event Category: Defined in the GetFeedback for Web and App backend when setting up the integration
- Event Action: A description of how the visitor interacted with GetFeedback for Web and App
- Event Label: The comment submitted with the feedback item
- Event Value: The mood rating score a visitor provided, 1 being the most negative score, 5 being the most positive score
Campaigns:
- Event Category: Defined in the GetFeedback for Web and App backend when setting up the integration
- Event Action: A description of how the visitor interacted with GetFeedback for Web and App
- Event Label: The analytics ID of the specific campaign
Integrating GetFeedback with Google Analytics using GTM
You can also integrate GetFeedback data into Google Analytics (GA) using Google Tag Manager’s (GTM) data layer.
This integration will work with the following GetFeedback products:
Understanding the Data Layer
A data layer is a JavaScript array that can store information. It acts as a simple database that lives on a website, where you can store valuable information about your users or page content. The information collected in the data layer can be everything from key attributes of a website (URL, page title, etc.) to information for marketing or analytics tags, like campaign ID, purchase history, or other user data.
The data layer gives you a single data point where you can store and access all your third-party data. It also enables you to easily integrate with other third-party technologies.
Pushing GetFeedback Data to GTM Data Layer
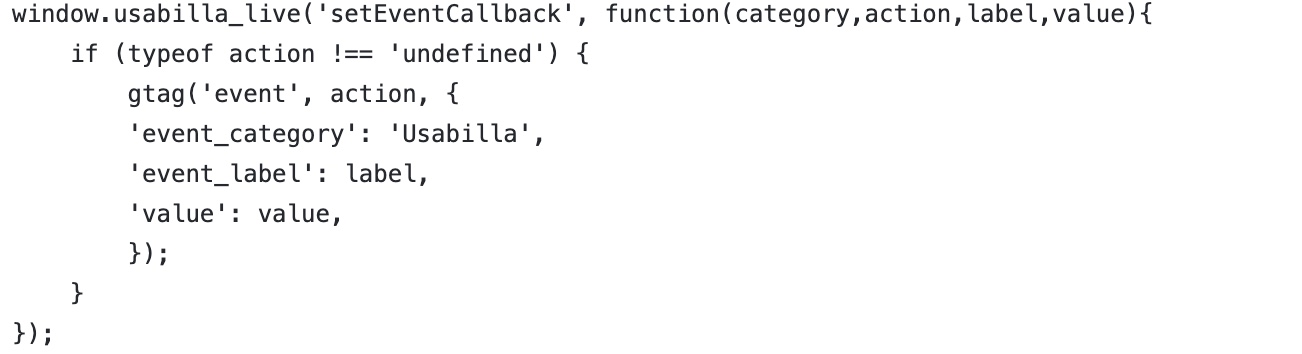
First, you’ll need to add a code snippet into a tag in Google Tag Manager. This code snippet will make sure that all feedback that's left, is getting pushed into the data layer.
- In GTM, click Tags > New > Tag Configuration.
- Choose the tag type “Custom HTML” then copy and paste the code snippet below into the custom HTML tag:

Creating Data Layer Variables in GTM
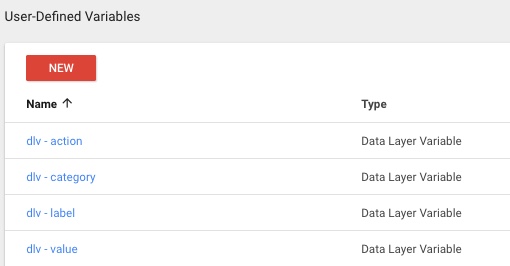
Now it's time to create some variables in Google Tag Manager. These variables will connect the data in the data layer with GTM.
In your main GTM view, go to “Variables” and click on “New”. In the variable configuration window, select “Data Layer Variable” as variable type:
The variables you create in this step depend on what data you want to send to Google Analytics. Here, we'll use the standard variables "category", "action", "label" and "value" from our event callback method.
Now let’s get back to creating our variables. We will create 4 data layer variables in this example. Give each of them a descriptive name, but make sure that you give it the correct data layer variable name. Variable names should be the same in GetFeedback and Google Tag Manager.
Now, we shall have these data layer Variables created in our Google Tag Manager account:
Creating a Trigger for a Custom Event in GTM
To send the data layer variables to Google Analytics, we need to define a trigger for when a user interacts with GetFeedback.
Go to “Triggers” then select “New”.
Select the “Custom Event” trigger type. Enter Usabilla as the Event name
Next, choose “All Custom Events”
Connecting Data from Data Layer Variables to a GA Event Tag
To recap what you’ve done so far:
- You’ve made sure that GetFeedback data is sent to the data layer
- You’ve created and connected data layer variables
- You’ve created a trigger in GTM that fires every time a GetFeedback action activates our Event Callback Method.
Now you need to connect what you’ve created so far to Google Analytics.
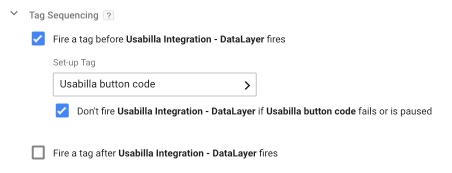
Go to your main GTM view, click on “Tags”, then “New”.
When clicking on Tag Type add a “Google Analytics - Universal Analytics” tag. As Track Type select “Event”. Connect the data layer Variables by mapping them out, one by one, from the slide-out menu that appears. Last, but not least, add the GetFeedback trigger that we just created. Your final setup should look like this:
Creating a Custom Report in Google Analytics
You’ve pulled data from the data layer and into Google Analytics. Now you can present your data in a Google Analytics report.
How you create your custom report depends on which data you've pushed into Google Analytics. In our example, we'll make use of the information that's sent along with the variables category, action, label, and value:
- Within Google Analytics click on the "Customization" tab, then "Custom Reports" and after that on the "New Custom Report" button.
- Enter a title for your custom report and enter a name for your report tab.
- Add the following four metrics: Users, Unique Events, Pages / Session, and Avg. Value.
- Add the following Dimension drill-downs: Event category, Event action, Page, and Event label.
- Optional: You can also add a filter.