Apply
How to Apply a Status to an Application
Application Statuses allow you to add a custom status to your applications based on the round the application is in. This article will walk through how to apply a status to an application that is visible to the applicant.
How to Apply a Status through the Stage Settings
Once you have created a status within your stage you can choose to automatically apply one status to all applications that enter that stage. This will not only apply the status to the application but it will also enable the status to be visible to the applicant on their application.
To apply a status automatically to applications that enter the stage:
- Go to the Stage Configurations of the stage the status should be applied in.
- Go to the Settings Tab.
- Under the Application Status section, select the status that has been created.
How to Manually Apply a Status
There are 3 ways to apply a status manually:
By moving the Application to a new stage
- Go to the Manage Applications page within a program.
- Select the checkbox to the left of the application's title.
- Select Move Stage.
- Select the stage to move the application to from the drop-down menu.
- Click the Status you wish to Set.
- Select Move.
This will also fire any automations that have been setup to fire based on the application moving to this stage.
Within the Admin Application Preview
- Go to the Manage Applications page within a program.
- Select the application ID to enter the Admin Application Preview.
- Click Status.
- Select the status you wish to apply.
Within Manage Applications
- Go to the Manage Applications page within a program
- Select the application(s) you wish to add or change the status for.
- Click Workflow.
- Click Change Status.
- Select the status you wish to give the application based on the stage they are in.
- Click Change Status.
How to Automatically Apply a Status
In some cases, you may have multiple statuses within a single stage that you wish to apply. If this is the case you can use Automations to apply different statuses to different applications within a single stage.
For example, in some cases, after an applicant has moved through the review stage, they may need to be sent back to the application stage to make updates or corrections to their application. This action is based on a reviewer response in the reviewer form to move the application back to the application stage.
The reason we use an automation is that we do not want to apply a status to all applications in the stage, only ones that have been in the Reviewer stage and been moved back.
WHEN TO APPLY
| Source | Event | Target |
| Review | Reviewer has completed a Review | Reviewer Stage |
CONDITIONS
| Reviewer Form: Would you like to request more information from the Applicant? | is exactly | Yes |
DO
| Action Source | Action |
| Application | Assign a Status to the Application |
| Status: | Additional Information Required |
How it Appears in the Site
Once you have applied a status to an application it will be visible to your applicants on their application tile.
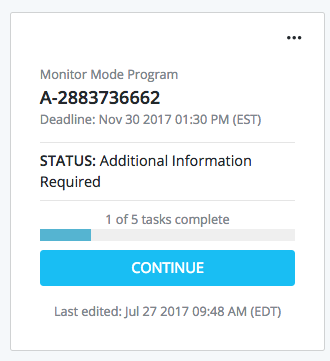
Therefore, when the applicant logs into their account they will be able to quickly identify where their application is in the process. Using the above example we can also notify the applicants that additional information is required in their application and they will need to enter their application to complete it.