GetFeedback
GetFeedback for Live Chat
GetFeedback for Salesforce Chat immediately displays a survey after a chat session to measure the customer's experience with your support agent, or redirect your customers to a survey, if agents are not available.
Before You Start
Enable Salesforce Chat in your Salesforce account. You can enable chat using Lightning Service Setup or Salesforce Classic.
Designing a Post-Chat Survey in GetFeedback
In GetFeedback, open or create a survey to display at the end of the chat. To avoid display issues, remove the title page of the survey.
We recommend using a Customer Effort Score (CES) or Customer Satisfaction (CSAT) survey with a follow-up text area or structured question. However, you may use any survey or question type you want.
The example below shows a CES survey that displays right after a Salesforce Chat has ended:

Connecting your Survey to Salesforce
Connect your survey to the Salesforce org that has live chat enabled. From your survey, select Mappings > Salesforce Custom Mappings, then select your Salesforce environment.
Setting up Salesforce Chat in GetFeedback
Attach your survey to a Salesforce Chat button. You can attach a survey to multiple buttons, but each button can only have 1 survey.
To set up Salesforce Chat distribution from GetFeedback:
- From your survey, select Distribute > Website > Salesforce Chat.
- Select the Salesforce Chat Button to attach to your survey. If you don’t have a Salesforce Chat Button available, create one.
- Select Attach this button.
- Choose a Salesforce site to connect to the button.
Setting Up Chat Using Lightning Setup
If you installed Salesforce Chat using Lightning Setup, your chat button won’t be associated with a Salesforce Site, and you’ll see an error in GetFeedback. To fix this error:
- From the Salesforce Chat screen, select View in Salesforce next to your button name.
- On the Chat Buttons and Automated Invitations page, select Edit.
- Choose a force.com site in the Site for Resources field. Your Lightning settings won’t be overwritten.
Adding Trusted Domains in Salesforce
You may need to add *.salesforceliveagent.com to the CSP and CORS settings in Setup (not Service Setup).
- In Setup, go to Sites.
- Select Edit on the site you attached your button to.
- For Clickjack Protection Level, select Allow framing of site pages on external domains (Good protection).
- In Setup, go to Session Settings and add the link to your page to the Trusted Domains for Inline Frames.
Digital Experience Settings
If your chat is on a digital experience survey page, you’ll need to update your digital experience site's CSP settings.
Using Merge Fields
We attach merge fields to the survey link generated by the chat session. These merge fields come from Salesforce Chat Deployment APIs (addCustomDetail and findOrCreate.saveToTranscript) your developer used when setting up the Salesforce Chat button on your website.
The first one allows you to add custom detail for each user, and the second allows you to attach Salesforce Objects found or created before the chat started.
The post-chat survey uses these values:
- chatKey
- startTime
- requestTime
- agentId
- agentName
- lastVisitedPage
- disconnectedBy
Example:

All custom detail that you define will be attached to the Survey URL as merge fields using the label as the merge field name (we will “snake_case” the label and also prefix it with “chat_custom_”) and the value as the merge field value.
For example, if you use the following code:

we add the following merge field to the survey url: ?chat_custom_first_name=Kimberly.
All the Salesforce Objects that are found or created will have their IDs automatically attached to the Survey URL as merge fields. The object name will be the merge field name, and the object ID will be the merge field value.
For example, if you use the following code:

We would add the following merge field to the survey url: ?caseid=5001XXXXXXXXXXXXX.
Mapping to Salesforce
You can map survey responses to Salesforce using our managed mappings package or your custom mappings.
Using Managed Mappings
If you use our managed mappings package, we’ll automatically map your post-chat surveys to the Response object in Salesforce.
To use managed mappings:
- From your survey, select Mappings > Managed Mappings.
- Install the managed package if you haven’t already.
- Turn on the toggle to Sync to Salesforce using Managed Mappings.
- Select the button to Install GetFeedback for Salesforce Chat Package, then finish installing the package.
Using Custom Mappings
Use custom mappings if you want to control where to store post-chat survey data. You don't need to install any packages if you use custom mappings.
To use custom mappings:
- From your survey, select Mappings > Salesforce Custom Mappings. Make sure you’re in your Draft survey.
- Select the Salesforce connection to use for draft and live survey results.
- Set up mappings for the object you want to send data to. Learn more about creating custom mappings
Redirecting to a Salesforce Case Survey
If an agent is not available to pick up a chat with an incoming request, you can set Salesforce Chat to time out after a certain amount of time or let the agent decline the chat. In either of these cases, you can then redirect the user to a GetFeedback Salesforce Case Survey that the customer can fill out to create a case in your help desk.
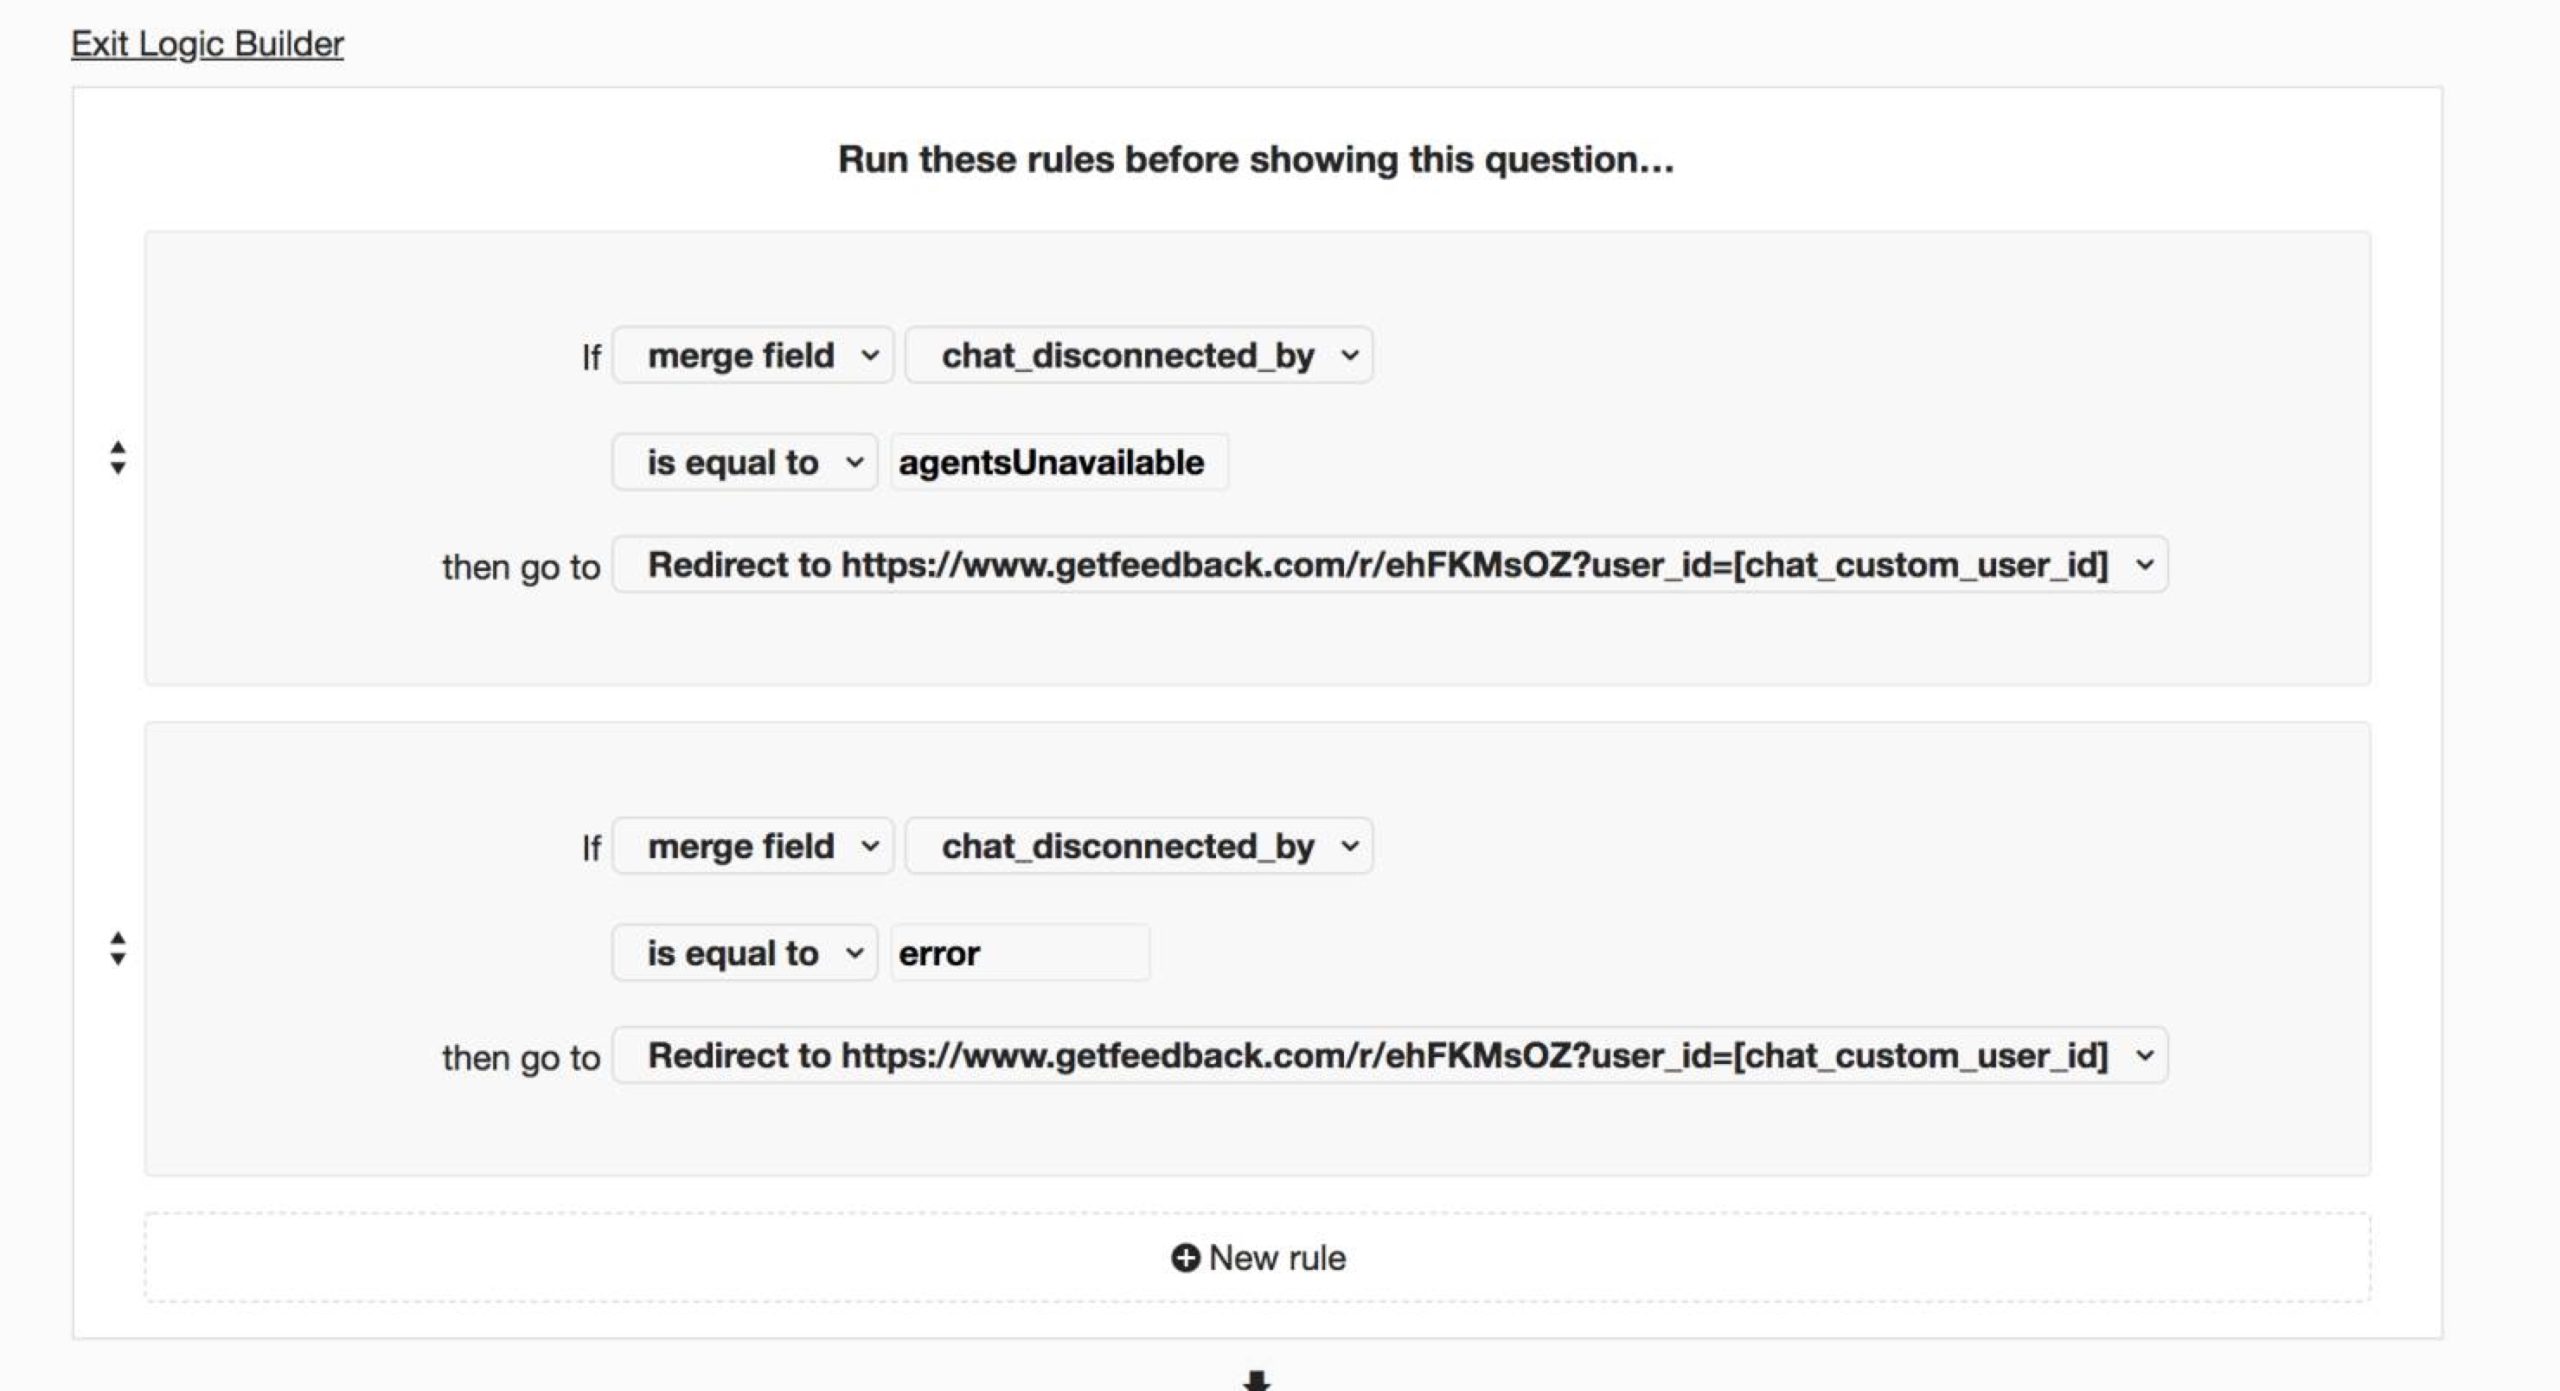
To show a survey after the chat disconnects:
- Add either of the following merge fields to your survey link:
- chat_disconnected_by
- chat_start_time
- Take your survey once so we can record the merge fields you added. Once you submit your survey, you can use your merge fields in the survey logic.
- In your survey, add a logic rule before the first question.
- Create a rule based on the merge fields you added:
- If chat_disconnected_by is equal to error, go to a custom exit page that redirects to your survey.
- If chat_start_time is equal to blank, go to a custom exit page that redirects to your survey.
The image below shows an example of the logic rules: