- What are Pages?
- How to Access Pages
- Page Portals
- Page Feature Terminology
- The Public Portal
- Site Pages & Menu
- Site Homepage
- How to Edit Your Homepage
- "Redirect Homepage to a Specific Program" Setting
- Program Listing
- The Applicant Portal
- Default Applicant Pages
- Additional Applicant Pages
- The Reviewer Portal
- Default Reviewer Pages
- Additional Reviewer Pages
- How to Manage Pages
- Edit a Page
- Delete a Page
- Duplicate a Page
Apply
How to Add and Manage Pages
- What are Pages?
- How to Access Pages
- Page Portals
- Page Feature Terminology
- The Public Portal
- Site Pages & Menu
- Site Homepage
- How to Edit Your Homepage
- "Redirect Homepage to a Specific Program" Setting
- Program Listing
- The Applicant Portal
- Default Applicant Pages
- Additional Applicant Pages
- The Reviewer Portal
- Default Reviewer Pages
- Additional Reviewer Pages
- How to Manage Pages
- Edit a Page
- Delete a Page
- Duplicate a Page
Pages are used to convey information and associated material to visitors of your site. This article will cover the basics of default pages as well as how to add and manage additional pages to be used as resources for users with select roles.
What are Pages?
How to Access Pages
Pages are managed by site administrators and are completely customizable. Images, files and other content can be added to these pages to tailor the content to your users while following the same theme and layout as rest of your SM Apply site. To access your existing pages or to create a new page you will first need to go to the Pages section of your site.
To access Pages:
- Select the Settings menu
- Select Pages

Page Portals
Pages are added to provide informational resources for users within the site. They can be made available to all visitors or targeted to specific roles. For example, pages can be accessible by applicants to provide instructions or templates needed to complete their applications. Alternatively, pages can be accessible only to reviewers in order to provide score sheets or benchmarks to assist with completing reviews. There are three areas where pages can be added: the Public Portal, the Applicant Portal, and the Reviewer Portal. These areas are described in more detail later in this article.

Page Feature Terminology
Common features and settings appear when creating or editing a new page. To prep you for creating your own pages, refer to the descriptions below.
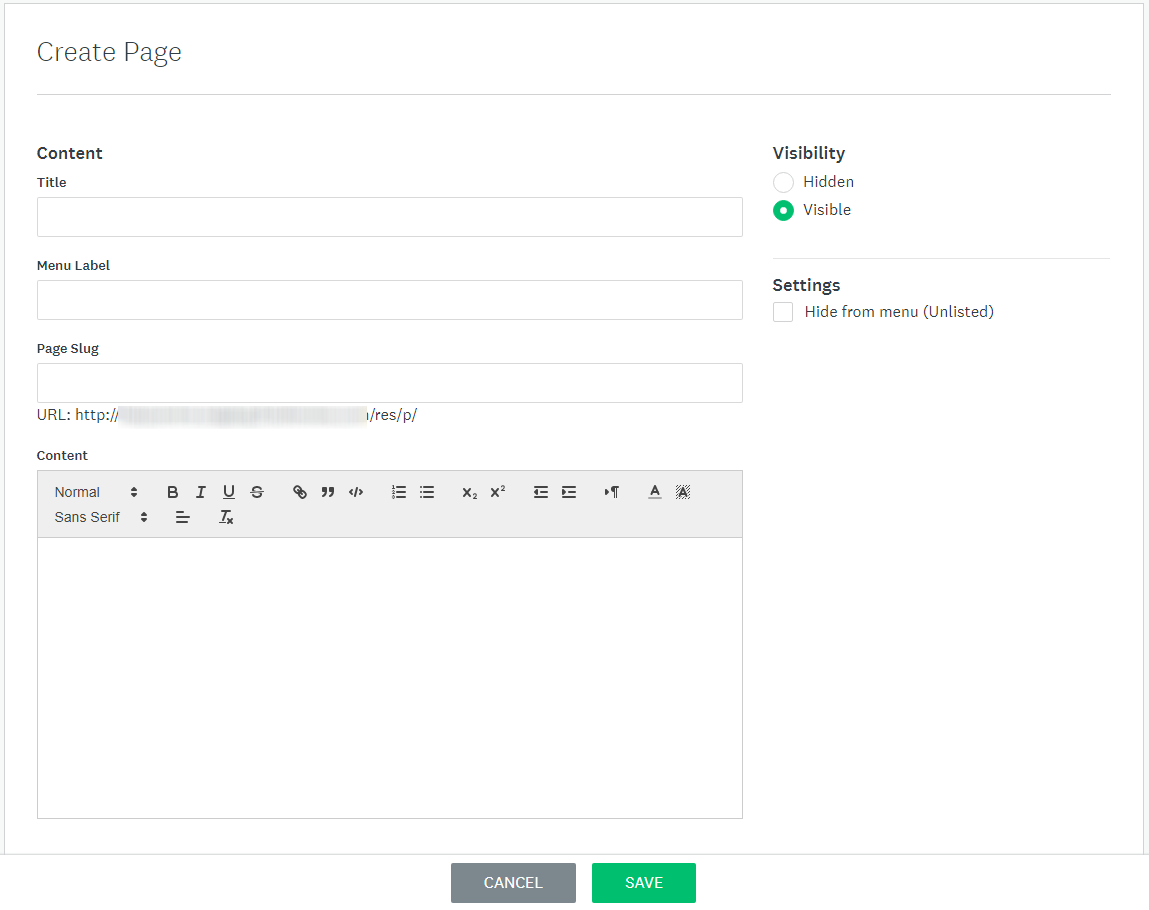
| Feature | Description |
| Title | The title page that appears to the visitor. |
| Menu Label | This label is presented in the Pages menu and will redirect a user to this page when selected. |
| Page Slug | This value completes the URL of the page to direct users successfully. The layout of this URL will be https://yoursite.smapply.io/res/p/slughere |
| Content | The text input here can contain pictures, links, lists, etc. to design the page for your users. Page content can be edited at any time. |
| Visibility | Enable one of two settings to adjust the visibility of the page to users within your site. Hidden: Hidden pages do not appear in the Pages menu and can't be accessed even when a direct link is provided. Visible: Visible pages are displayed in the taskbar at the top of the user's screen. Visible pages made available to certain roles will only appear for users with that role. For example, applicants cannot see reviewer pages and reviewers cannot see applicant pages. |
| Hide from menu (Unlisted) | Unlisted pages are accessible only with a direct link to the page. This can be in the form of a hyperlink displayed in through hyperlink text or a link sent through email. Page will be hidden from the user's Pages menu. |
The Public Portal
The Public Portal is the first tab within the Pages section. Within this tab, administrators can customize various pages available to anyone visiting the site (including non-members). There are three configurable areas within the Public Portal tab:
Site Pages & Menu
Public pages are added from this location.
To add a Public Page:
- Go to Pages
- Select Add Page
- Add a Page title
- Add a Menu label (this is the title that will appear in the Pages drop-down menu on the home screen)
- Customize your page slug. It is only required to add the ending of the URL which will appear after https://yoursite.smapply.io/res/p/
- Build your page in the content text box
- Select Preview to review your page
- Select Save
Site Homepage
The selected page will act as the site homepage where users will sign in or choose to register for an account.
How to Edit Your Homepage
To edit your site homepage:
- Locate your selected homepage within the Site pages & menu section of the Public Portal
- Select the More Options icon
- Select Edit
- Edit the content and preview to review your changes
- Select Save
"Redirect Homepage to a Specific Program" Setting
Enabling Redirect homepage to a specific program allows you to display a program's landing page as your homepage. The contents of this page can be edited from the Program Settings (link) by editing the Full Description of the program you are redirecting to. When a program's homepage is used, the login fields will be presented on the page to allow visitors to sign in.

TIP! This setting is useful to advertise a specific program accepting applications and can be ideal when a site hosts only a select number of programs that do not run simultaneously.
Program Listing
Selecting a page in this section will determine where your program list will appear for visitors to your site. This list will consist of all available programs within your site at that point in time.
If you don't want your programs publicly listed, check the "No listing page" option.
The Applicant Portal
Default Applicant Pages
There are two default application pages as well as any additional applicant pages you wish to add as resources for your applicants.
Default pages are required and cannot be deleted.
The two default applicant pages are:
| My Applications | The "My Applications" page displays a summary of the user's applications including their progress, status and date the application was last edited. |
| Programs | A list of programs applicants can apply to if they meet eligibility requirements. |
See How to Edit Pages for step by step instructions to edit default pages.
Additional Applicant Pages
Additional application pages will be displayed as additional resources to applicants only. Pages marked as visible will be accessible from the taskbar at the top of the page when the user signs in or by accessing the page URL directly. Some examples of pages that may be added here are instruction pages to complete an application, information on the award process, and templates for completing a specific task.
To add additional applicant pages:
- Select Add Page
- Create a Page title
- Add a Menu label. This will be the title of the resource within the Pages dropdown menu in the user's taskbar.
- Customize the unique page slug. It is only required to add the ending of the URL which will appear after https://yoursite.smapply.io/res/p/
- Build your page in the content text box
- Select Preview to review your page
- Select Save

The Reviewer Portal
Default Reviewer Pages
The pages found here are only visible to users with a reviewer role. Within this section, you will be able to edit the single default reviewer page and edit/create any pages to be visible solely to users with a reviewer role.
Default pages are required and cannot be deleted.
There is one default reviewer page:
| Review Assignments | The reviewer dashboard displays all of the reviewers' assigned applications. |
See How to Edit Pages for step by step instructions to edit default pages.
Additional Reviewer Pages
Additional reviewer pages will be available within the Pages drop-down for the user once they are signed in or by selecting a link to a page you have added. Some examples of pages that would be presented to reviewers could be scoring rubrics, instructions to complete a review or a database of fellow reviewers.
To add additional reviewer pages:
- While in Pages, select the Reviewer Portal tab
- Select Add Page
- Create a Page title
- Add a Menu label. This will be the title of the resource within the Pages dropdown menu in the user's taskbar.
- Customize the unique page slug. It is only required to add the ending of the URL which will appear after https://yoursite.smapply.io/res/p/
- Build your page in the content text box
- Select Preview to review your page
- Select Save

How to Manage Pages
Edit a Page
To edit a page:
- Select the More Options icon in line with the page's title
- Select Edit
- Edit the content or settings
- Select Save
Delete a Page
To delete a page:
- Select the More Options icon
- Select Delete
- Confirm to delete the page
Duplicate a Page
To duplicate a page:
- Select the More Options icon
- Select Duplicate
Default pages cannot be duplicated. All duplicated pages will have their URL slightly updated as every page must have a unique location.