Apply
Automations: “CONDITIONS”
The second component of any automation within SM Apply is the Condition which is the set of rules that determine whether the automation will fire when the activation has occurred. This article covers the basics of these rules including how to configure rules to complete your automation.
What are Conditions?
Conditions
Conditions are the set of rules that will be validated after the activation of an automation has occurred. These rules are not required for the setup of an automation and many basic automations may bypass this entirely. An automation will not fire unless all rules listed as Conditions have been satisfied. Below is an explanation of the various parts that make up the conditions of an automation.
| Component | Description |
| Matching Criteria | ALL: all rules listed must be met in order for the automation to fire ANY: one or more rules must be met for the automation to fire |
| Filter | This is the base of the rule and targets the question or action that is occurring. Examples: The question: "What city were you born?" The action: Promoted to a new stage |
| Matching Parameters | This determines what the rule is looking for when a specific answer is given. Available Parameters: - Value is exactly - Value is not - Value is one of - Value is not any of - Value contains - Value does not contain - Value has no response - Value has a response The available parameters will vary depending on the Filter selected |
| Item | The specific answer or action that must be given or must occur in order for the rule to be satisfied. The choices available here are form, task, and site-specific, and will update as changes to your site are made or new components are added. Filter example continued: Answer: Ottawa Stage Name: Application Stage |
"Select a Filter" Menu
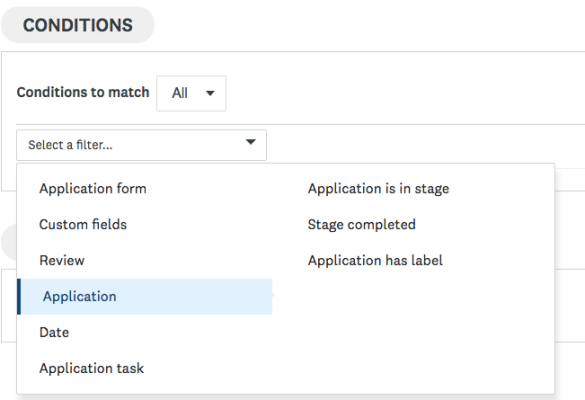
A dropdown menu is used to select the rules that the automation will validate before performing the actions stated within the DO statement. The menu is entered when the -- Select a filter -- dropdown arrow or title is selected. This menu is similar to the menu used to set the activation of your automation in that it consists of a Source menu on the left and an Event menu on the right.

Explaining Matching Criteria
The Matching Criteria setting is the first component of the Condition and determines when the rules are considered to be satisfied. There are two options as described earlier: ALL or ANY.
| ALL If the matching criteria is set to ALL, then the actions will not be performed by the automation unless all rules have been satisfied. ANY If ANY is selected, any individual rule that is satisfied will result in the actions within the DO statement to be completed. |
If an automation did not activate for an expected application, check the matching criteria to ensure that the correct option has been chosen.
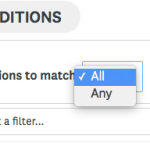
To set or edit the matching criteria of your automation simply toggle to selection as shown below. If you are editing the matching criteria of an active automation be sure to save your changes.

Setting the matching criteria is all or nothing. In some cases, you may have a combination of rules where there are certain rules that must be met and a variety of others where one rule must be met. For more information on this use case, see Nesting.
Adding New Rules
How to Add a Rule
By default, a single rule will appear available to configure when an automation is created.

To configure your first rule:
- Set the Matching Criteria of your Condition
- Select the Select a filter dropdown menu
- Select the Task or Action group from the left-hand side of the menu
- Select the action, completion status, or other condition from the right-hand side of the menu. This will close the first dropdown menu.
- Select the Matching Parameter for the rule. This is the second dropdown menu available within the rule.
- Select the third dropdown and complete your rule by selecting a specific Item
How to Add Additional Rules
In some cases, it may be necessary to compile multiple rules for a single automation for the appropriate actions to take place.
To add additional rules:
- Select Add Rule (plus sign)
- Set the filter, matching parameter, and item to complete the rule
Editing or Deleting Rules
How to Edit a Rule
Once a rule has been added it can be edited as needed. This may be due to a change in your process, or to modify an automation that has been configured incorrectly.
To edit a rule:
- Enter the automation where the rule exists to edit the condition
- Select the filter, matching parameter, or item dropdown to edit
- Save the automation for the changes to take affect
How to Delete a Rule
To delete a rule:
- Select Delete to remove the associated rule
- Save the automation for changes to take effect
Deleting a rule cannot be reverted. Deleted rules can only be recovered by recreating the rule altogether.
Nesting Rules
Overview
Once the matching criteria has been set for your Condition, all rules that have been listed are checked to ensure that either ALL of the rules are satisfied or ANY (at least one). In some cases, this may not satisfy the eligibility required for your automation. To bypass this you are given the ability to Nest rules together which ultimately groups a minimum of two rules together and allows the builder to assign the group its own matching criteria.
There are two requirements in order to be able to nest:
- There must be at least one existing rule
- There must be a minimum of two rules to nest
TIP! Nesting may not be necessary if the responses conditional responses needed for a specific action are choices for a single question. Make use of the matching parameters 'is one of' or 'is not one of' to state that multiple answers are acceptable under a single rule.
How to Create a Nested Rule Group
To nest two or more rules together:
- Configure at least one rule within the condition
- Select Add Rule to add the next rule
- Select Nest Rule
- Set the matching criteria
- Configure a minimum of two rules to be nested
- Optional: To add more than two rules within a single nested group, select the Add Rule icon associated with one of the nested rules to add another rule to the existing nested group
- Optional: To add another rule that is not nested, select the Add Rule icon for any rules that do not exist within the nested group. This action will add a new rule underneath the nested group.
A single condition can contain multiple nested rules. Similarly, a new nested group can be created within an existing nested group.
Example of a Nested Rule
To demonstrate with an example, assume an application form is a required task for one of your programs. Based on a set of responses, an automation will determine which labels will be applied to the application. Three questions are asked:
- What are your plans after University/College?
- Where were you born?
- Where do you currently live?
If the applicant answers Travel to question 1 the label Travel will be applied to the application through this automation. However, based on the eligibility of the program, only applicants that were born in Canada or currently live in Canada should be labelled with the Travel label. Based on these conditions, the single matching criteria of ALL or ANY will not satisfy all three rules that are required. If the matching criteria was set to ALL, the applicant would need to provide ALL of the following answers:
| What are your plans after University/College?: Travel AND Where were you born?: Canada AND Where do you currently live?: Canada |
BUT, the criteria for this label only requires Canada as an answer to Question 2 OR 3.
If the criteria is switched to ANY, the applicant would need to provide ANY of the following answers:
| What are your plans after University/College?: Travel OR Where were you born?: Canada OR Where do you currently live?: Canada |
This would mean that if the applicant provides any ONE of those answers, they will be given the Travel label which is incorrect since they must answer Travel to Question 1 and Canada to either Question 2 or 3.
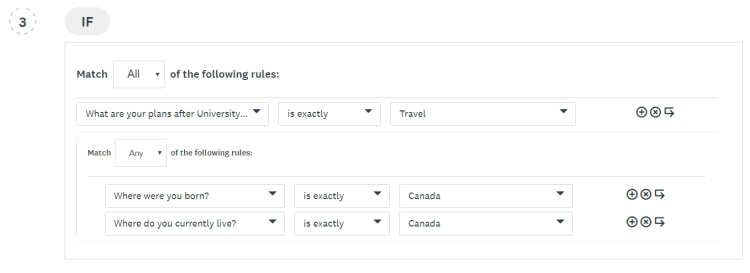
To resolve this we will be nesting two rules together and have a condition that consists of both the ALL and ANY matching criteria. This build is shown below:

The breakdown for this nesting example is that the label will be applied when either of the two situations are occur with the user's responses:
| What are your plans after University/College?: Travel AND Where were you born?: Canada |
OR
| What are your plans after University/College?: Travel AND Where do you currently live?: Canada |