Apply
How to Add CAS Details
How to Configure CAS
To configure CAS with Apply: :
- Navigate to the Settings tab (gear icon)
- Click on the Registration section
- Under Single Sign-On, enable
- Select CAS as the Sign-On Provider
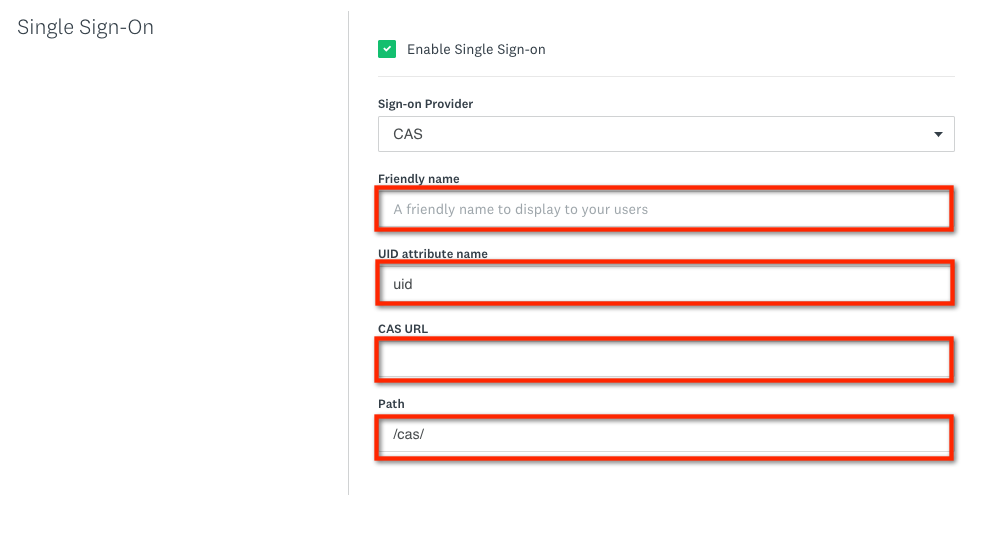
Before you save, the following fields are required: Service Name and Service URL. It is highly recommended that you input your desired attribute in the UID Attribute Name field, but it is not required. Additional explanations for the fields are as follows:
- Friendly Name: The service name is a required text field. This text is what is used to title the CAS sign-in button.
- UID Attribute Name: This is the attribute that is being sent over from the service provider as the unique ID. If it is not id, uid, or user then the name of the attribute here being used as the UID should be input here. If left blank Apply will default to looking for the attributes of id, uid, and user.
- CAS URL: This should be the url that leads to the current protocol service (the service provider).
- Path: If a virtual server hosting a CAS server is installed in a non-standard path, please adjust this field to reflect the correct location.
User Account Details in Apply:
For SSO integrations using CAS, Apply handles payloads automatically. As such, Apply defaults to looking for the standard attribute names for First Name, Last Name, and Email of a user to complete their user profile information in Apply. Apply requires the following attributes to be passed:
| Apply Required Attribute | Accepted Standard Attribute Names |
| First name | firstName, first_name, or givenname |
| Last Name | lastName, last_name, or sn |
| email, or mail | |
| UID | id, uid, or user* |
*Note: for UID only, Apply looks for the default standard attributes of id, uid, or user unless a different attribute name has been input in the “UID Attribute Name” field in the CAS Integration setup page in Apply.
Additional Attribute Release via CAS:
Additional attributes can be released to Apply. With CAS the integration of attribute release is set up through the IdP. For CAS “Return Mapped Attribute release” is the attribute release policy that will facilitate attributes being released from the IdP to Apply. The attributes released from the IdP are placed into applicant custom fields in Apply. Apply applicant custom fields are automatically created when additional attributes are sent to Apply.
Additional attributes can be pulled into SM Apply. To set this up you will need to add Custom Fields in Apply. This can be done by:
- Click on the Settings tab
- Select Custom Fields
- To add in fields, select New Field in the top right of the page
- On the Create Custom Field page, ensure to set the target to Applicants
For more information in regards to Custom Fields please refer to How to Create a Custom Field.