GetFeedback
Response Notifications
Get email notifications when respondents submit feedback through web and app forms or complete your email surveys.
Email Notifications for Any Survey
In Insights, you can set up response notifications for multiple surveys, including web buttons and campaigns, app forms, and email surveys.
You can create several types of notifications in Insights:
- Email Notifications: Send alerts directly to an email address.
- Webhook: Push data to other apps when you receive new responses. You can use Zapier to set this up, or get a developer’s help.
- Slack Notifications: Post new responses that require quick action from your team, or share feedback to build customer empathy in your org. Learn more
- Salesforce Response Mapping: Map feedback from a survey to Salesforce for tracking and reporting. This feature works best for web and app surveys; in app.getfeedback.com, you can use Managed and Custom Mappings for your email surveys. Learn more
Only Administrators can set up email notifications in Insights. If you can create a new workspace, you have the Administrator role.
To set up email notifications:
- Go to Insights. From app.usabilla.com or app.getfeedback.com, select Insights in the left-side menu.
- Select Automations from the left-side menu.
- Select New Action.
- Give your action a name at the top of the screen. Anyone who gets notifications from this action can see the name.
- Select Email Notifications, then select Continue To Data.
- Select the forms to get notifications for, then select Continue To Conditions.
- Select to get notifications for All responses or Responses that match conditions. You can set conditions for an answer, a custom variable, or a URL.
- Answer: The answer respondents left to a specific question
- Custom variable: Any variable stored in your database, such as “account type” or “Plan level.”
- URL: The URL where respondents left feedback or took your survey.
- Select Continue To Details.
- Enter the email addresses to send emails to.
- Enter an email subject and (optional) message.
- Select Create Action.
- Your action is turned off by default. To start email notifications, turn on the toggle for your action.
Email Survey and Mapping Notifications (app.getfeedback.com)
Get notifications for email survey responses. You can also get notifications for failed Salesforce mappings.
All Survey Responses
- In app.getfeedback.com, go to your survey and select Settings.
- Under Response Notifications, turn on the toggle to Email me all responses to this survey. We’ll send you an email every time someone responds to your survey.
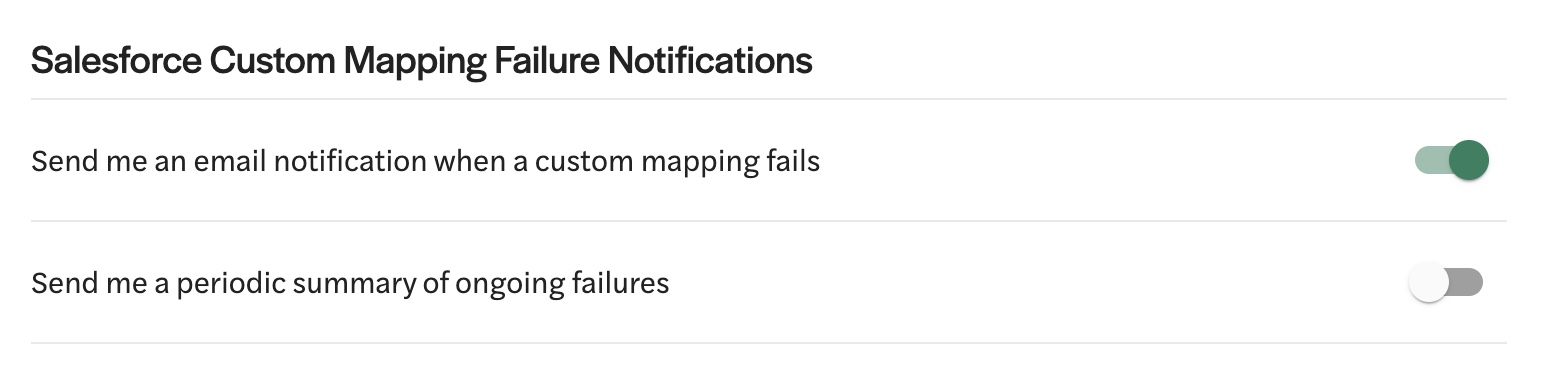
Salesforce Failed Mapping Notifications
If you have Salesforce mappings enabled, you can get an email notification when your mappings fail. To turn on failed mapping notifications:
- In app.getfeedback.com, go to your survey and select Settings.
- Toggle on the option to Send me an email notification when a custom mapping fails.
- (Optional) To get notifications about mappings that fail repeatedly, toggle on the option to Send me a periodic summary of ongoing failures.
Custom Actions
You can also set up conditional email alerts, set Salesforce tasks for your teammates, and post Slack notifications. These email alerts can send your responses to different email addresses, set follow-up tasks in Salesforce, or post in Slack based on the set conditions.
To create a Salesforce Task record, set up your Salesforce integration. To post to a Slack workspace, set up your Slack integration.
To set up custom notifications:
- In app.getfeedback.com, go to your survey and select Actions. Make sure you’re in Draft mode.
- Name the action.
- Add a condition that triggers the notification. You can set conditions for:
- The answer to a specific question
- Merge fields
- Response language
- To add another condition, select Add Condition. If you use multiple conditions, choose Match All or Match Any to determine when to trigger the action.
- Match All: Feedback must meet all conditions to trigger the action.
- Match Any: Feedback must meet at least one condition to trigger the action.
- Add an action that happens when the condition is met. You can:
- Send an email
- Create a Task record in Salesforce
- Post to Slack workspace
- To add more actions, select Add Action.
- When you’re ready, select Save Action.
When a respondent sends feedback that meets the conditions, you’ll get the custom notification you created.
App Response Notifications (app.usabilla.com)
For in-app forms, you can turn on email notifications for all feedback sent through a form.
To turn on email notifications for a form:
- In app.usabilla.com, go to the Apps area.
- Select Setup.
- Find the form you want to turn on notifications for.
- Select the 3 dots, then select Edit.
- In the top right, select Advanced.
- Check the box for I want to push all feedback items to an email address.
- Enter the email address to send feedback notifications to. You can use an individual address, group address, or generic Slack address.
- Select OK, then select Save.
Any feedback sent through this in-app form is now sent to the email address you entered.
Web Response Notifications (app.usabilla.com)
For web forms, you can get email notifications for all feedback or specific responses. You can also set up automated exports for your feedback.
All Feedback Responses
Get emails for each feedback item sent through buttons and web forms that you have access to.
You’ll only get notifications for surveys, buttons, and campaigns you have access to.
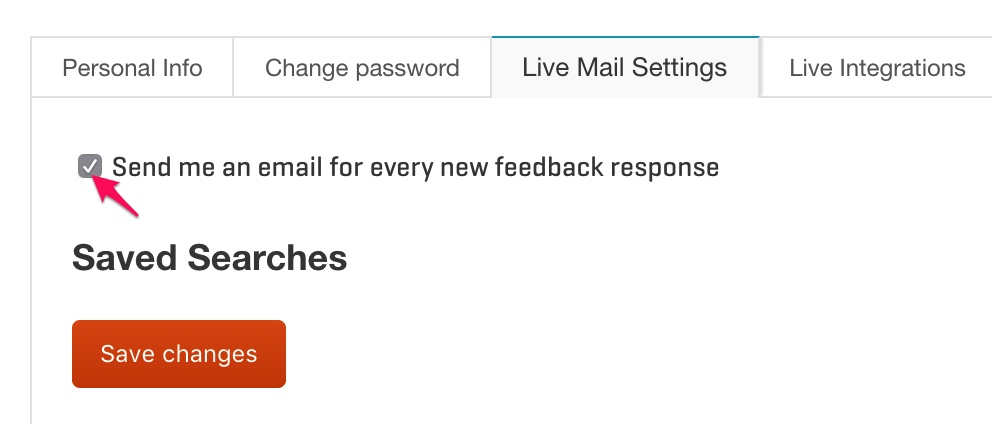
- In app.usabilla.com, select your account in the bottom left corner, then select Account Settings.
- Select the Mail Settings tab.
- Check the box to Send me an email for every new feedback response.
Certain Responses Only
If you don’t want notifications for all responses, you can create a saved search for the feedback most relevant to you. For example, if you want to see feedback from your website’s career page only, you can filter for that URL and save your search. Then, you can turn on notifications to receive emails for feedback that matches your search.
You can use email notifications to:
- Send all single feedback items in your filtered dataset periodically
- Send one email with all feedback items in your filtered dataset, periodically
To send feedback for certain items only:
- In app.usabilla.com, go to the Buttons & Forms section and select Feedback.
- Apply filters to view the feedback items you want. Learn more about filtering your results
- At the top of the left panel, select New Save Filter.
- Name your saved filter.
- (Optional) Choose who to assign the saved filter to:
- This account: Assign the filter to yourself. If you set up email notifications, you’ll get emails at your email address.
- Team members: Assign the filter to team members in GetFeedback. If you set up email notifications, both you and the assigned team members get emails.
- Check the box to Send email updates for this search, then set up the email options:
- Select the email format: Extended or Minimalistic.
- (Optional) If you chose Extended email format and want to get feedback links in your email, check the box to Include public links.
- To view feedback items in separate emails, check the box to Send only 1 feedback item per email.
- If you want to get all feedback items in an email, leave the box unchecked.
- Select the email frequency.
- Select Save to create your filter and turn on email notifications.
Automatically Export Feedback
You can only send automatic exports to people with a GetFeedback account.
Automatically send a .csv export with the last feedback to one or more email addresses. These exports contain the unfiltered dataset that your recipients have access to.
To set up automatic exports:
- In app.usabilla.com, under the Buttons & Forms section, select Feedback.
- In the top right of the screen, select Export > Automatic Export.
- Turn on the Send CSV file via email toggle.
- Enter the email addresses to send the file to. Put a comma after each address.
- Enter a subject line for the emails.
- Select the email frequency.
- Select Save to turn on automatic exports.