Apply
How to Manage/Edit Applications after a Deadline
After an application deadline has been passed, applicants may want to make adjustments to their application. This article will walk through the different ways in which this can be done, both by the administrator or by the applicant themselves.
How to Edit a Task on Behalf of the Applicant
How to Edit an Application while Assuming the Role
One way to edit an application on behalf of an applicant is to assume their role in the site. This can allow you to view the application as that applicant. However, while assuming the role of the user you will take on the same restrictions as that user. For example, deadlines, or visibility settings on the tasks.
If the deadline has passed, the application is locked, or the task is not visible to the applicant, refer to How to Edit an Application through the Admin Application View below for more information.
To edit an application:
- Assume the role of the applicant.
- Click to Start or Continue their application.
- Click to Start or Continue the specific task you wish to edit.
- Make your necessary changes.
- Click "Save & Continue Editing" or "Mark as Complete."
How to Edit an Application through the Admin Application View
In some cases, you may need to bypass restrictions placed on the task/application for the applicant, such as a deadline, or visibility setting. If this is the case you can edit the application through the Administrator View of an Application.
To edit an application:
- Go to the Admin Application View.
- Click on the Application tab.
- Go to the Task you wish to Edit.
- Click on the More Options icon.
- Click Edit Task.
- Make your necessary changes.
- Click "Save & Continue Editing" or "Mark as Complete."
If the form was "Completed" prior to making changes, it is important to press Mark as Complete. Clicking Save & Continue will update the task status to be In Progress.
How to Extend the Deadline for Select Applications
SurveyMonkey Apply does not offer the direct ability to extend a deadline for only specific users. Any deadline set on the program, stage or task, will apply to all applications that have applied to that program. However, once applications are in progress you can:
Adjust the deadline that has been set or extend the grace period
To adjust a deadline on a stage:
- Go to your Workflow.
- Click on the Name of the stage to access the stage configurations.
- Click on Settings.
- Click on the Close Date/ Deadline field to access the Date Calendar.
- Select a deadline date you wish to apply to the stage.
- Add a Time for when the deadline will be closed. The time zone that is set will be based on your sites time zone. However, to the end user, the time will be converted to display in the user's time zone.
- Optional: Enter a grace period (in hours). Grace periods allow users to access or edit a stage after the deadline has passed. This grace period will not be displayed to the users. This value can only be a whole number and the grace period cannot be placed with a decimal, such as 1.5.
- You can now click Save to confirm your changes.
The stage deadline will be automatically applied to all tasks within the stage. However, if an individual task has its own task deadline, the task deadline will override the stage deadline, provided that the deadline on the task is before the stage deadline.
Hide the program from new applicants within the Applicant Portal
To hide a program from the Applicant Portal:
- Go to the site dashboard.
- Select the More Options icon in the top right corner of the program card.
- Select Hide from applications.

You will notice a new icon appear in the top right corner of the program card. This indicates that the program is hidden from applicants in the Applicant Portal.
Restrict Editing from Certain Applications
If you are extending the deadline, but not all of the applications should be editable, you can choose to restrict the ability to edit the application so that only your chosen applications are editable. In order to restrict editing you can use one of the following methods:
How to Re-open a Submitted Application to allow for Applicant edits
Once an application is submitted, applicants may ask if they can make important adjustments to their submission. In order for applicants to make their own edits, the application must be in the Application Stage where edits will be applied and must be re-opened. Both of these actions can be combined into one step:
- Go to the Manage Applications page within a program.
- Select the checkbox to the left of the application's title.
- Select Workflow.
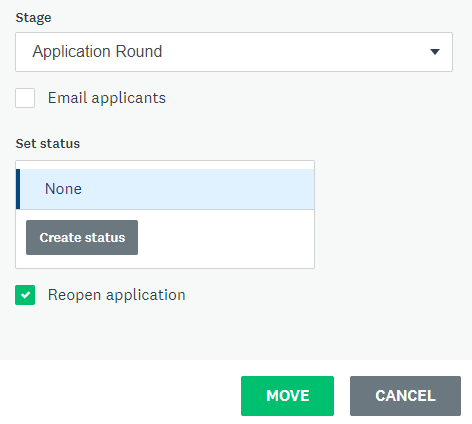
- Click Move Stage.
- Select the stage to move the application to from the drop-down menu (ie. Application Round).
- Select the reopen application check box.
When the applicant logs back into the portal, they will be able to Edit their Completed Task and re-submit their application.