Apply
How to Manage your Salesforce Integration
How to Rename your Salesforce Integration
You may need to rename your Salesforce integrations to help differentiate between them.
To rename your Salesforce integration:
- Access the Salesforce Integration section of the site
- Click the name of your Salesforce integration.
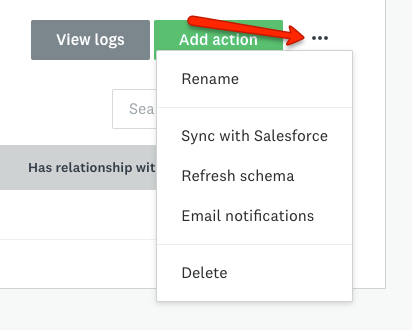
- On the integration page, click on the More Options icon at the top of the Integration.
- Click Rename
- The Salesforce Settings dialogue will open. Enter in a new name in the text response field.
- Click Rename
How to Manually Sync with Salesforce
Single Program Sites
To manually sync with salesforce if you only have one program in your site:
- Access the Salesforce Integration section of the site
- Click the name of your Salesforce integration.
- On the integration page, click on the More Options icon at the top of the Integration.
- Click Sync with Salesforce
Manual Syncs will update existing records in SF - this is helpful for retroactive fixes/updating information such as Reviewer scores. There are no limits on the number of manual syncs you can do. However, keep in mind the API calls that could be made with this. Deactivate all actions you do not want to run when doing a manual sync to help limit the API calls as much as possible.
Multi-Program Sites
WARNING! We do not recommend to use manual syncs when you have multiple programs, as a manual sync is not program specific. All actions will sync for all applications.
The below information is applicable if you only have one program within your SM Apply site.
Sometimes the Salesforce integration isn’t added to the Apply site until after some Apply records/data have already been created. If this is the case, you can perform a manual sync that will apply all active Salesforce actions to all the existing objects in the system. This includes automations that are active.
For example, if you have Salesforce actions that will map an Application owner’s name to a Salesforce Lead name, any existing applications will sync to new Lead objects in Salesforce.
To specifically run a manual sync on an unsuccessful action:
- Access the Salesforce Integration section of the site
- Click the name of your Salesforce integration.
- Click View Logs
- Locate the action in the logs
- Click Rerun
How to Refresh your Salesforce Schema
During the integration set up, we pull in all the Salesforce objects and fields in your account. These objects/fields are then available when you set up your Salesforce integration actions.
After the initial setup, our integration syncs once a day. So when a new field/object added to Salesforce outside the sync time, you’ll have to do a sync to see it. We call this “refreshing your Salesforce schema”.
To refresh your Salesforce schema:
- Access the Salesforce Integration section of the site.
- Click the name of your Salesforce integration.
- On the integration page, click on the More Options icon at the top of the Integration.
- Click Refresh schema
- In the Salesforce Settings dialogue, press the Refresh Schema button
- Once the refresh is complete, the new fields and objects will be available
How to Delete your Salesforce Integration
WARNING! Deleting the Salesforce integration will remove the connection from your SurveyMonkey Apply site. The action logs for the integration will erase. Any automation actions pointing to the integration will no longer sync with Salesforce.
To delete your Salesforce integration:
- Access the Salesforce Integration section of the site
- Click the name of your Salesforce integration.
- On the integration page, click on the More Options icon at the top of the Integration.
- Click the Delete button.
- Click Save
How to Enable Email Notifications for Errors
When enabled, SM Apply sends a daily digest of sync errors that happened in the past 24 hours. If no errors have occurred, no email will send. The email will send daily around 7AM EST to the Salesforce account user, and include a link to the action log.
To enable or disable daily error notifications:
- Access the Salesforce Integration section of the site
- Click the name of your Salesforce integration.
- On the integration page, click on the More Options icon at the top of the Integration.
- Click Email Notifications
- Click Add Recipient
- Enter the email address of the recipient that should receive the notification.
NOTE: If you wish to add multiple recipients, click Add Recipient for each. - When you have added all recipients, click Save