In this article
- How to Create a Salesforce Action
- Add Push Action
- Action Details
- Field Mappings
- Relationship Mappings
- File Attachments
- Add Pull Action
- Action Details
- Field Mappings
- How to Push Reviewer and Recommender Data
- How to Manage an Action
- How to Turn an Action ON/OFF
- How to Edit an Action
- How to Duplicate an Action
- How to Delete an Action
Apply
How to Create a Salesforce Action
In this article
- How to Create a Salesforce Action
- Add Push Action
- Action Details
- Field Mappings
- Relationship Mappings
- File Attachments
- Add Pull Action
- Action Details
- Field Mappings
- How to Push Reviewer and Recommender Data
- How to Manage an Action
- How to Turn an Action ON/OFF
- How to Edit an Action
- How to Duplicate an Action
- How to Delete an Action
Actions specify what data will move between SurveyMonkey Apply and Salesforce and when. It’s the link between an object in SM Apply and an object in Salesforce.
How to Create a Salesforce Action
To create a Salesforce action:
- Access the Salesforce Integration section of the site
- Click the Title of your Salesforce integration.
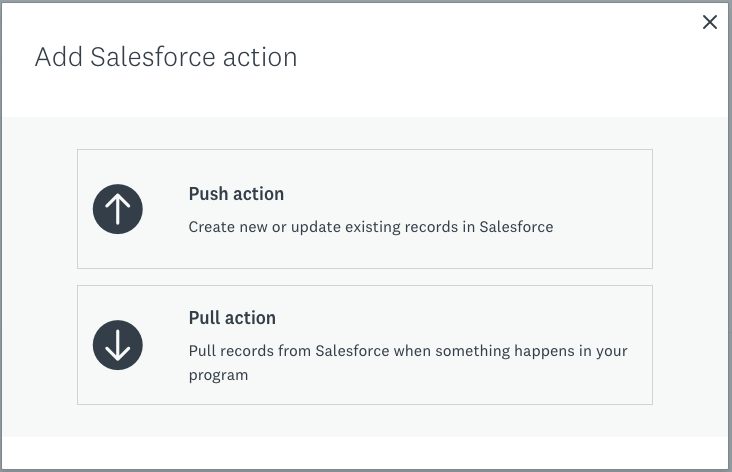
- Click the Add Action button. This will open a dialogue where you’ll configure the action.
- Choose Push to Salesforce or Pull from Salesforce.
- Complete the Add Push/Pull Action dialogue.
- Click Save to continue.
TIP! Push creates or updates Salesforce fields with application data. Pull bring in information from Salesforce into an application, custom field, or form fields.
Add Push Action
The Add Push Action dialogue is where you'll finish setting up the action. Here is a list of the options to fill out:
Action Details
| Setting | Description |
| Title | The name of your Salesforce action. Give it a clear name so you can distinguish between actions. |
| Salesforce Object Type | Records that are created or updated by this action will be of an object type that is specified here. |
| Fire Action When: | When should SM Apply sync the source object to Salesforce. The available options are, when an application has been:CreatedEditedSubmitted NOTE: This setting should only be used within the push action of single-program sites. If you have multiple programs in your site or wish to configure advanced sync options, you should use an automation action instead. If this is the case, you can leave this selection blank and create your automation. |
Field Mappings
This section is for choosing which particular fields you want to map between the source and destinations objects.
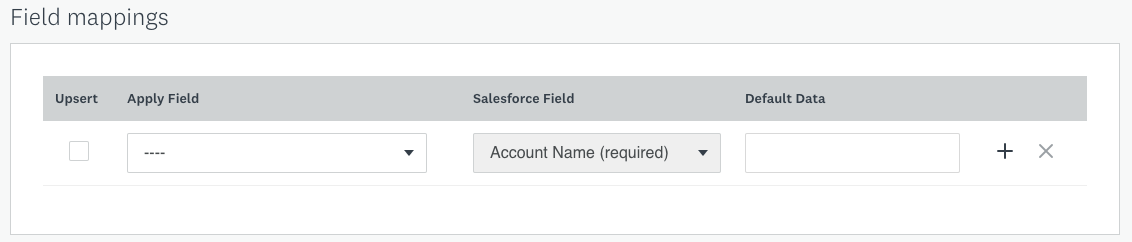
| Upsert | The upsert field, if selected, will cause the system to check to see if an object already exists with the same value. This field is also known as a “unique” field. Here are a few things to take into consideration when making a field mapping Unique: - Multiple fields can be specified as unique and then the match must be successful on all specified fields - All unique fields must have a value in order for the sync to work. - SurveyMonkey Apply does a search on the fields the first time the action runs. - If it does, it will update the existing object rather than create a new one, thus ensuring that only one record in Salesforce has that value. - If we find more than one SF object, it will fail as we have no way of knowing which object to update. - TIP! This is commonly used with email addresses or IDs to make sure that duplicate records aren’t created for the same object. This is case insensitive. If the field changed from “apply@surveymonkey.com”' to 'Apply@surveymonkey.com”' then the field will be updated; a new one would not be created. If the unique field(s) has/have no value, then SM Apply does not attempt to run the action. - The “unique” fields are seen as a unique identifier and they have to have a value; otherwise, we’ll end up with a lot of SM Apply objects pointing to the same Salesforce object. |
| Apply Field | Select what data from the application you want to sync: Available Apply Fields include: - Form Responses - Basic Fields about Application and Owner - Application and Applicant Custom Fields - Custom: use specified Default Data option NOTE: You will not be able to use fields from the Eligibility form or Reviewer and Recommender Custom Fields. |
| Salesforce Field | Select the field the Salesforce object will push SM Apply data to. NOTE: Required fields may be found in PUSH actions and will appear automatically |
| Default Data | Specifying a default value for the data will replace the value of a field with the value specified IF the source field being mapped doesn’t have a value. If mapping “Custom - use specified default data option” as described above, the default data is always used. |
| Add/ Remove Mapping | Press the plus button to add another field mapping or the X button to remove an existing mapping. |
Relationship Mappings
SM Apply supports Lookup fields (both optional and required) along with Master-Detail fields. For more information in regards to Relationships you can refer to Salesforce's reference material about Relationships.
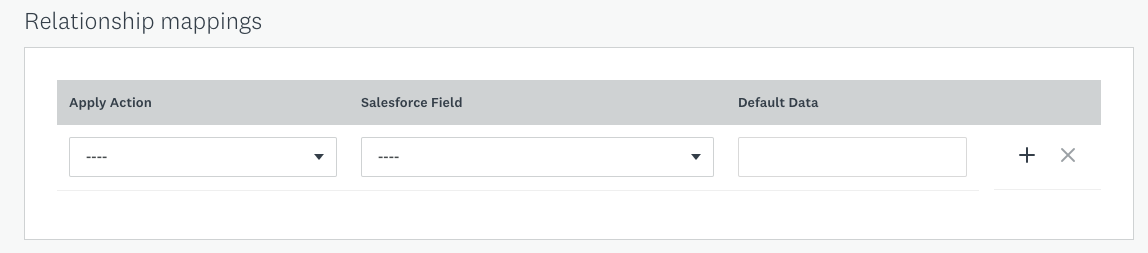
Relationship Mappings are located below the "Field Mappings" area of a Push Action.
You can choose to create a relationship between an already existing SM Apply Action and the Salesforce Field. The object must be the same in order to create the relationship.
For more information in regards to this, you can refer to Advanced Mapping with Relationships
File Attachments
If the selected Salesforce object type supports it, and if it is a Push action, you will be able to specify any file attachments that should be synced. File attachments are synced separately from the fields themselves, and the newly created Attachment object in Salesforce will be linked to the created record.
You won’t be able to see your attachments in Salesforce until you enable the Notes and Attachments panel. Additionally, an attachment being edited will NOT activate a SF action in any case (created, edited or submitted).
For more information in regards to this, you can refer to How to Push Attachments to Salesforce
Add Pull Action
A Pull Action is very similar to a PUSH Action, however we are pulling information from a Salesforce field into a SM Apply field.
Action Details
| Setting | Description |
| Name | The name of your Salesforce action. TIP! Give it a clear name so you can distinguish between actions. |
| Salesforce Object Type | Records that are created or updated by this action will be of an object type that is specified here. |
| Fire Action when: | When should SM Apply sync the source object to Salesforce. The available options are, when an application has been: - Created - Edited - Submitted NOTE: This setting should only be used within the pull action of single-program sites. If you have multiple programs in your site or wish to configure advanced sync options, you should use an automation action instead. If this is the case, you can leave this selection blank and create your automation. |
| Run when the following fields match | A PULL action will only occur when the selected Salesforce field matches the mapped, corresponding SM Apply field. This means that this information needs to be in SM Apply first. Custom Fields can be used with this as well. |
Field Mappings
This section is for choosing which particular fields you want to map between the source and destinations objects.
| Apply Field | Select what data from the application you want to sync.Available Apply Fields include: - Form Responses - Basic Fields about Application and Owner - Application and Applicant Custom Fields - Custom: use specified Default Data option NOTE: A Pull Action will not overwrite existing responses. This means that the pull will only occur once, there is no editing of a field to initiate another pull in the same form even if the responses are blank (as blanks are considered a response). Custom fields, however, are an exception to this rule. NOTE: You will not be able to use fields from the Eligibility form or Reviewer and Recommender Custom Fields. |
| Salesforce Field | Select the Salesforce field that data will be pulled from, into the SM Apply field. |
| Default Data | Specifying a default value for the data will replace the value of a field with the value specified IF the source field being mapped doesn’t have a value. If mapping “Custom - use specified default data option” as described above, the default data is always used. |
| Add/ Remove Mapping | Press the plus button to add another field mapping or the X button to remove an existing mapping. |
How to Push Reviewer and Recommender Data
Within a Salesforce Action you can also Push or Pull Reviewer or Recommender Data to your Salesforce Account.
Within the SM Apply Field mapping you can select both Reviewer and Recommender forms to select a question within the form to pull from. If you wish to push Scores from your form into Salesforce you will need to configure AEP to calculate the score in a hidden field within the form
When multiple reviews are given on a single application, the data will be pushed to Salesforce, comma separated into a single record.
How to Manage an Action
How to Turn an Action ON/OFF
Your action is on by default.
To turn your action off:
- Access the Salesforce Integration section of the site
- Click the name of your Salesforce integration
- Under the far right column click on the More Options icon
- Click Activate or Deactivate
NOTE: The option that appears will be based on the current Status of your Action.

How to Edit an Action
- Access the Salesforce Integration section of the site
- Click the name of your Salesforce integration
- Under the far right column click on the More Options icon, and click Edit
-- OR --
Click on the Name of the Action - Make your required changes and click Save
How to Duplicate an Action
A new action will be created with an "Inactive" status. The name of the action will be similar to the original with (Copy) on the end of the name. Once the Action has been duplicated you can edit the new action with any necessary changes.
- Access the Salesforce Integration section of the site
- Click the name of your Salesforce integration
- Under the far right column click on the More Options icon
- Click Duplicate
How to Delete an Action
Once deleted, an action cannot be retrieved again within the site.
- Access the Salesforce Integration section of the site
- Click the name of your Salesforce integration
- Under the far right column click on the More Options icon
- Click Delete
- Confirm that you wish to delete the Action