GetFeedback
Web Overlay Surveys (Modals)
Web overlay surveys are a great way to engage prospects and visitors when they visit your site. Add a GetFeedback web overlay survey directly to your site for all visitors to see, or use settings to target specific visitors, leads or prospects to ask for feedback.
Getting Started
First, build your GetFeedback website survey.
Keep the content of your survey short and sweet. Web overlay surveys appear inside a small widget or lightbox on your site, so you'll want to keep the language and survey questions concise.
You can't use merge fields to personalize web overlay surveys. However, you can add merge fields to track responses.
Web overlay surveys collect a webpage_url merge field by default. This allows you to track where on your site the response was collected. If you want to personalize your survey with merge fields, use GetFeedback Web Embed surveys instead.
Configure the Survey
Next, we'll configure the location, style, and targeting options for your survey by navigating to Distribute > Website > Web Overlay.
On the Web Overlay page, there are three sections of settings: Appearance, Appears On, and Triggers. As you make these changes, you'll see them reflected in the survey preview pane on the right side of the page.
Appearance

- Type- You can choose a drawer or a lightbox.
- The "Drawer" option places a drawer at the bottom of your website.
- The "Lightbox" option displays a pop-up lightbox when the survey button has been clicked. You can toggle between the options to see which looks best on your website.
- Place- You'll have two options here for placement on your website: lower left or lower right. For the lightbox option, ‘place’ controls where the survey button will appear.
The lightbox will always appear in the middle of your survey taker's screen once the button has been clicked to start the survey.
- Label- Adding a label allows you to add a call to action such as "Contact Us", or "Provide Feedback", or ask a question such as "Need help?"
- Mobile- While our surveys are mobile friendly, you can choose to show or hide surveys on devices such as iPads and smartphones.
- Icon- Finally, pick an icon and color that best fits your website theme and survey.
Appears on

You can use this section to control where on your site your web overlay will live. There are three conditions you can choose from prior to entering your URL(s):
- URL is exactly
- URL starts with
- URL contains
Each of these options controls what webpage your survey will appear on.
Triggers
Set conditions for survey placement on your webpage including:
- How long a visitor must be on the page prior to pop up.
- Where on the page the survey pop up should open.
- How often a survey is triggered for a single visitor.
- Trigger the survey for a certain percentage of visitors.
- Close the survey window once a response is submitted.
Installing GetFeedback Javascript on Your Website
The GetFeedback Support team isn't able to offer consulting services for coding issues because of the many nuances that may occur within your organization. This is provided as an example of where to start with your implementation, and may not cover all use cases or work in all organizational settings.
After you’ve finished setting up your overlay survey, you’ll need to access the GetFeedback javascript code by clicking View instructions in the bottom right corner of the template builder. You can also locate the code by going to Settings > Web Overlay > Edit.
If you don't have access to modify the HTML on your website, no problem. Enter your web developer’s email address and select Email Instructions. We'll send them an email with instructions on how to add this code snippet to your site.
Next, add the javascript snippet to each page where your GetFeedback web overlay survey will appear, just before the </body> tag. You only have to do this once, even if you create more overlay surveys.
Only surveys enabled in the web overlay builder will appear on your site.
Add Merge Fields to your Web Overlay Survey
Track details of your respondents by using merge fields in your survey. This involves a bit of coding within the javascript snippet.
Add your merge fields to the javascript snippet. We're using Contact ID as our example here:
gf('setParameters', {'ContactID': 'FIELD_VALUE'});
Replace FIELD_VALUE with the information you'd like associated with the survey results. 'ContactID' is the field name and can be edited to whatever you'd like displayed as the column title within the GetFeedback results.
When adding this to your code, this merge field will be added as a separate script tag that contains the function call to set the desired field. This might look like:
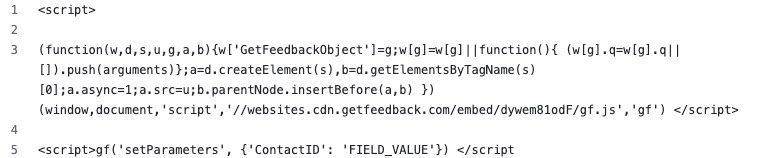
Enable your Web Overlay Survey
Now that you've installed the javascript on your site, and you've added merge fields, you can make the final edits to your overlay and turn the survey On.
Finally, press Save. You can always make changes to your web overlay survey in the future, as long as you always save your changes.
If your survey isn't displaying - review your network settings, firewall, or browser extensions that might affect javascript loading on your site.