GetFeedback
One-touch Surveys
Essentials feature: Available on Essentials, Pro, and Ultimate plans.
One-touch surveys help you raise response rates by embedding survey questions directly in an email. Once a respondent answers the embedded question, the rest of the survey, or a thank you page, displays in their browser.
You can either create an embedded email survey or manually embed a question in your email. The instructions change depending on which product you're using.
Before You Start
To embed GetFeedback Digital (app.usabilla.com) surveys, you'll need access to your email signatures.
Embedding Direct (app.getfeedback.com) Surveys
GetFeedback's one click email embed feature lets you embed a survey question directly into your email as a button or hide it behind a hyperlink. Using app.getfeedback.com, you can embed the following question types in an email:
- Rating
- Net Promoter Score (NPS)
- Like/Dislike
- Multiple choice
If you’d rather let GetFeedback create an email template for you, you can export an HTML email template with a survey question embedded.
Getting Started
First, build your app.getfeedback.com survey, then remove the title page. For one click embedded surveys, we recommend creating a survey with only one question so the survey is automatically submitted when respondents answer the embedded question.
Creating Links for Your HTML Template
You need to create links for each answer option in the question you want to embed in your email.
- From the survey editor, select the question to embed.
- In the right panel, select Copy Embed Link.
- In your HTML email builder, paste the embed link for each possible answer type. It will look something like this:
https://www.getfeedback.com/r/xxxxxx?gf_q[8571]=
In this example, we use a NPS question., Because NPS questions have eleven different response options, you’ll want to create eleven different links, one foreach possible answer to your NPS question (0-10). - Add an = symbol, then the number of the answer value. Repeat this for each link in your email. Each question type has different values.
For example, for the NPS question, add =0 to the end of the first link.
https://www.getfeedback.com/r/xxxxxx?gf_q[8571]=0
https://www.getfeedback.com/r/xxxxxx?gf_q[8571]=1
https://www.getfeedback.com/r/xxxxxx?gf_q[8571]=2
https://www.getfeedback.com/r/xxxxxx?gf_q[8571]=3
https://www.getfeedback.com/r/xxxxxx?gf_q[8571]=4
https://www.getfeedback.com/r/xxxxxx?gf_q[8571]=5
https://www.getfeedback.com/r/xxxxxx?gf_q[8571]=6
https://www.getfeedback.com/r/xxxxxx?gf_q[8571]=7
https://www.getfeedback.com/r/xxxxxx?gf_q[8571]=8
https://www.getfeedback.com/r/xxxxxx?gf_q[8571]=9
https://www.getfeedback.com/r/xxxxxx?gf_q[8571]=10 - You can add images to your links in your HTML email template, such as button icons. If you need images for your response option buttons, we recommend checking out Material Icons to download some.
These instructions work the same way for a Rating question- grab the embed url on the right-hand menu in your survey and assign the unique value to each URL.
Your HTML will look a bit like this:
<a href=" https://www.getfeedback.com/r/xxxxxxx?gf_q[8571]=0">
<img src="imagelinkfor0" alt="0">
</a>
The code sample above specifically creates the image for the "0" answer choice in an NPS question. If someone selects this image in your survey email, the survey will automatically submit a response of 0. If your question has eleven possible answers (like an NPS question, with answer options 0-10), you'll have eleven pieces of HTML like the above, one for each answer.
Embedding a Like/Dislike Question
The values of Like/Dislike questions are:
- Like: 1
Example: https://www.getfeedback.com/r/xxxxxxxx?gf_q[6429033]=1 - Neutral: 0
Example: https://www.getfeedback.com/r/xxxxxxxx?gf_q[6429033]=0 - Dislike: -1
Example: https://www.getfeedback.com/r/xxxxxxxx?gf_q[6429033]=-1
Embedding a Customer Satisfaction (CSAT) Question
The values for Customer Satisfaction questions are 1-5 (1 being the worst, 5 being the best).
Example:
Very Unsatisfied- https://www.getfeedback.com/r/xxxxxxxx?gf_q[6429034]=1
Unsatisfied- https://www.getfeedback.com/r/xxxxxxxx?gf_q[6429034]=2
Neutral- https://www.getfeedback.com/r/xxxxxxxx?gf_q[6429034]=3
Satisfied- https://www.getfeedback.com/r/xxxxxxxx?gf_q[6429034]=4
Very Satisfied- https://www.getfeedback.com/r/xxxxxxxx?gf_q[6429034]=5
Embedding Multiple Choice Questions
When embedding multiple choice questions, you can get a formatted link from GetFeedback for each answer option.
- From the survey question, select Get Embed Links.
- Select the answer you want to copy the link for.
- Paste your link into your email.
- Repeat for each answer option.
If you embed a multiple choice question where users can select more than one option, a window will pop up after the respondent picks an answer to let them choose additional answers.
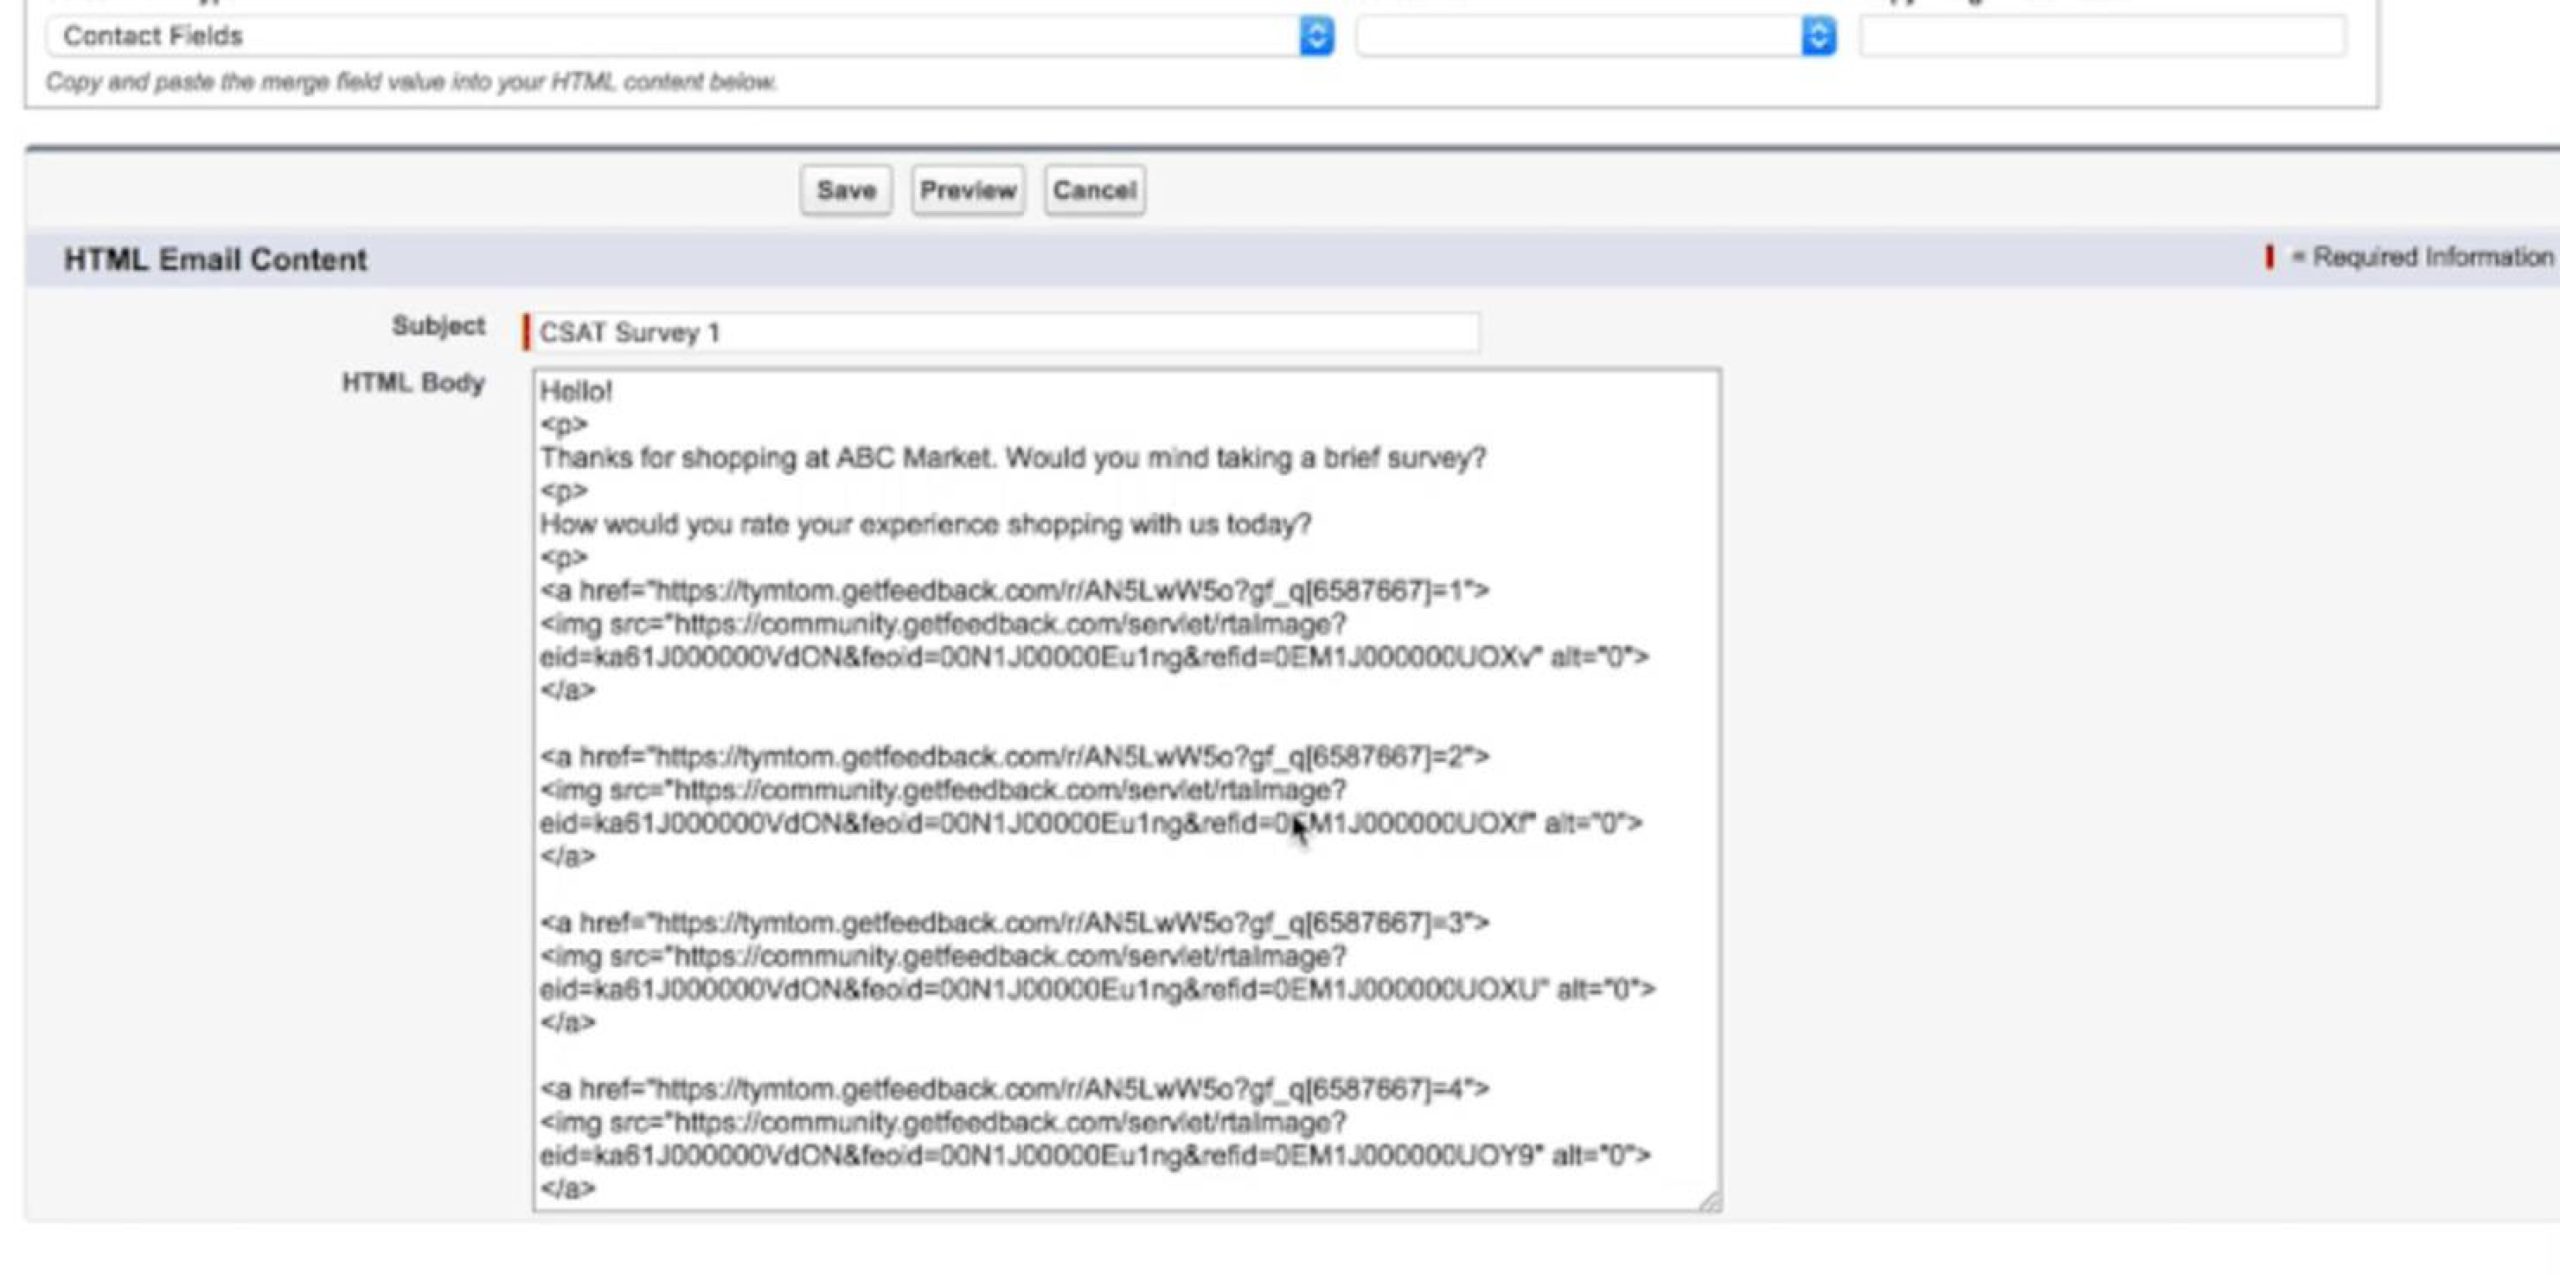
Setting up an HTML Email Template in Salesforce
If you use Salesforce, you can set up your embedded survey link using an HTML template in Salesforce.
In the example below, we've already added text and code for button images into the email template alongside the code for the button images.
- Paste the embed link into the HTML email template.
- Add the value to the link.
- Copy and paste the images you want to use as buttons into the email.
- Repeat these steps for all five rating question options.
- When you’re happy with your template, select Save.
Embedding Digital (app.usabilla.com) Surveys
Embed a web survey question directly into your email as an image, button, or hyperlink. You can embed a Mood,NPS, Rating, Single Choice (radio buttons) or a Multiple Choice (checkbox) question.
Types of Embedded Emails
When creating an embedded email campaign, you can choose between Individual and Group Campaigns.
Individual Campaign: gather feedback for a single purpose, such as automated or confirmation emails. All feedback from this campaign displays on a single trendline, regardless of where you embed the campaign.
Group Campaign: Collect feedback across multiple sub campaigns. Each copy of the embedded campaign has its own trendline, feedback, statistics, and tracking. You can compare the feedback from each campaign to compare success. Group Campaigns work well for newsletters, support agent emails, and email tests (A/B testing, etc.).
Use Campaigns to Create Email Widgets
To embed a survey widget:
- In app.usabilla.com, select Websites in the top left corner, then select Email.
- Select Setup, then select Create New Widget.
- Select either Individual Campaign or Group Campaign.
- Name your campaign at the top of the screen.
- Choose the rating scale to use.
- Select an introduction, or enter your own custom text.
- To store your respondents’ IP addresses or location, check the Store IP addresses or Store user location boxes.
- Select Next to start customizing your form.
- Customize your form. You can add new form controls (questions), edit and rearrange existing questions, or delete form questions.
- To change the form based on the response, set the Conditional Forms toggle to on.
- To change the form appearance, select an option for Custom Theme.
- Select Next to edit your survey’s exit screen.
- (Optional) Edit your form’s exit screen.
- Select Save to finish creating your campaign.
- Place your campaign in your email using one of the following options:
- Paste the form into an email
- Paste the HTML code for the form into an email, email signature, or HTML template
- Copy the direct link to the form
Embed Your Widget
After saving your widget, you can embed it in your email. If you need to embed your widget later, you can access these instructions from the Setup page.
To get the embed instructions:
- In app.usabilla.com, go to the Email product.
- Select Setup.
- Find your widget in the list.
- Select Widget installation instructions.
- Copy and paste the widget HTML code, or survey link in your email.
Embed a Usabilla for Web Survey
If you don't have access to Usabilla for Email, you can embed a web campaign into your email. Follow the instructions below to embed a web campaign.
Create a Full screen survey
You need a link for a Full screen survey to embed in your email. We'll set up the survey as a manual link so the button doesn’t show on your website.
- In app.usabilla.com for web, go to the Campaigns section and select Overview.
- Select New Campaign.
- Select Full screen survey.
- Select a button, then create your survey.
- When you reach the User Targeting section, select Don’t show survey. Use manual link instead.
- After saving the survey, go to Overview and select the survey to view and copy the link.
Create the links for each answer option
Once you've built your survey, go to Overview and select the form to view and copy the link. Then, you need to start adding certain variables to the link so when a user selects a link or form option from your email, the Mood rating they selected in the email will be prefilled. You'll need to customize the copied link for each answer option.
To make this work, add the following string to the end of your survey URL:
| ?reset&prefill_<IDENTIFIER>=<VALUE> |
The identifier refers to the question type. The identifier of the Mood rating element is mood.
The value refers to the answer options. In the case of Mood ratings, the value is a number between 1 and 5, 1 being the worst and 5 being the best.
The reset keyword lets a user fill out the same survey multiple times. If you don't want the same user to fill out the survey more than once, remove the reset keyword and the & symbol behind it.
5-scale mood rating
For a 5-scale Mood Rating, you'll have 5 separate links. Here's an example link for each of the 5 options:
| http://survey.usabilla.com/live/s/619ab9821708f11b106f485e?reset&prefill_mood=1 http://survey.usabilla.com/live/s/619ab9821708f11b106f485e?reset&prefill_mood=2 http://survey.usabilla.com/live/s/619ab9821708f11b106f485e?reset&prefill_mood=3 http://survey.usabilla.com/live/s/619ab9821708f11b106f485e?reset&prefill_mood=4 http://survey.usabilla.com/live/s/619ab9821708f11b106f485e?reset&prefill_mood=5 |
2-scale mood rating
You also have an option to use a 2-scale or 3-scale Mood rating. In the case of a 2-scale one, you'll need to use the lowest and highest score as the values:
| http://survey.usabilla.com/live/s/619ab9821708f11b106f485e?reset&prefill_mood=1 http://survey.usabilla.com/live/s/619ab9821708f11b106f485e?reset&prefill_mood=5 |
3-scale mood rating
In the case of a 3-scale one, you'll need to use the lowest and highest, as well as the middle score as the values:
| http://survey.usabilla.com/live/s/619ab9821708f11b106f485e?reset&prefill_mood=1 http://survey.usabilla.com/live/s/619ab9821708f11b106f485e?reset&prefill_mood=3 http://survey.usabilla.com/live/s/619ab9821708f11b106f485e?reset&prefill_mood=5 |
Add the links to your email
You're free to use the links you created in any way you'd like in your email—you can attach it to custom images or links of your choice.
Embedded email form template
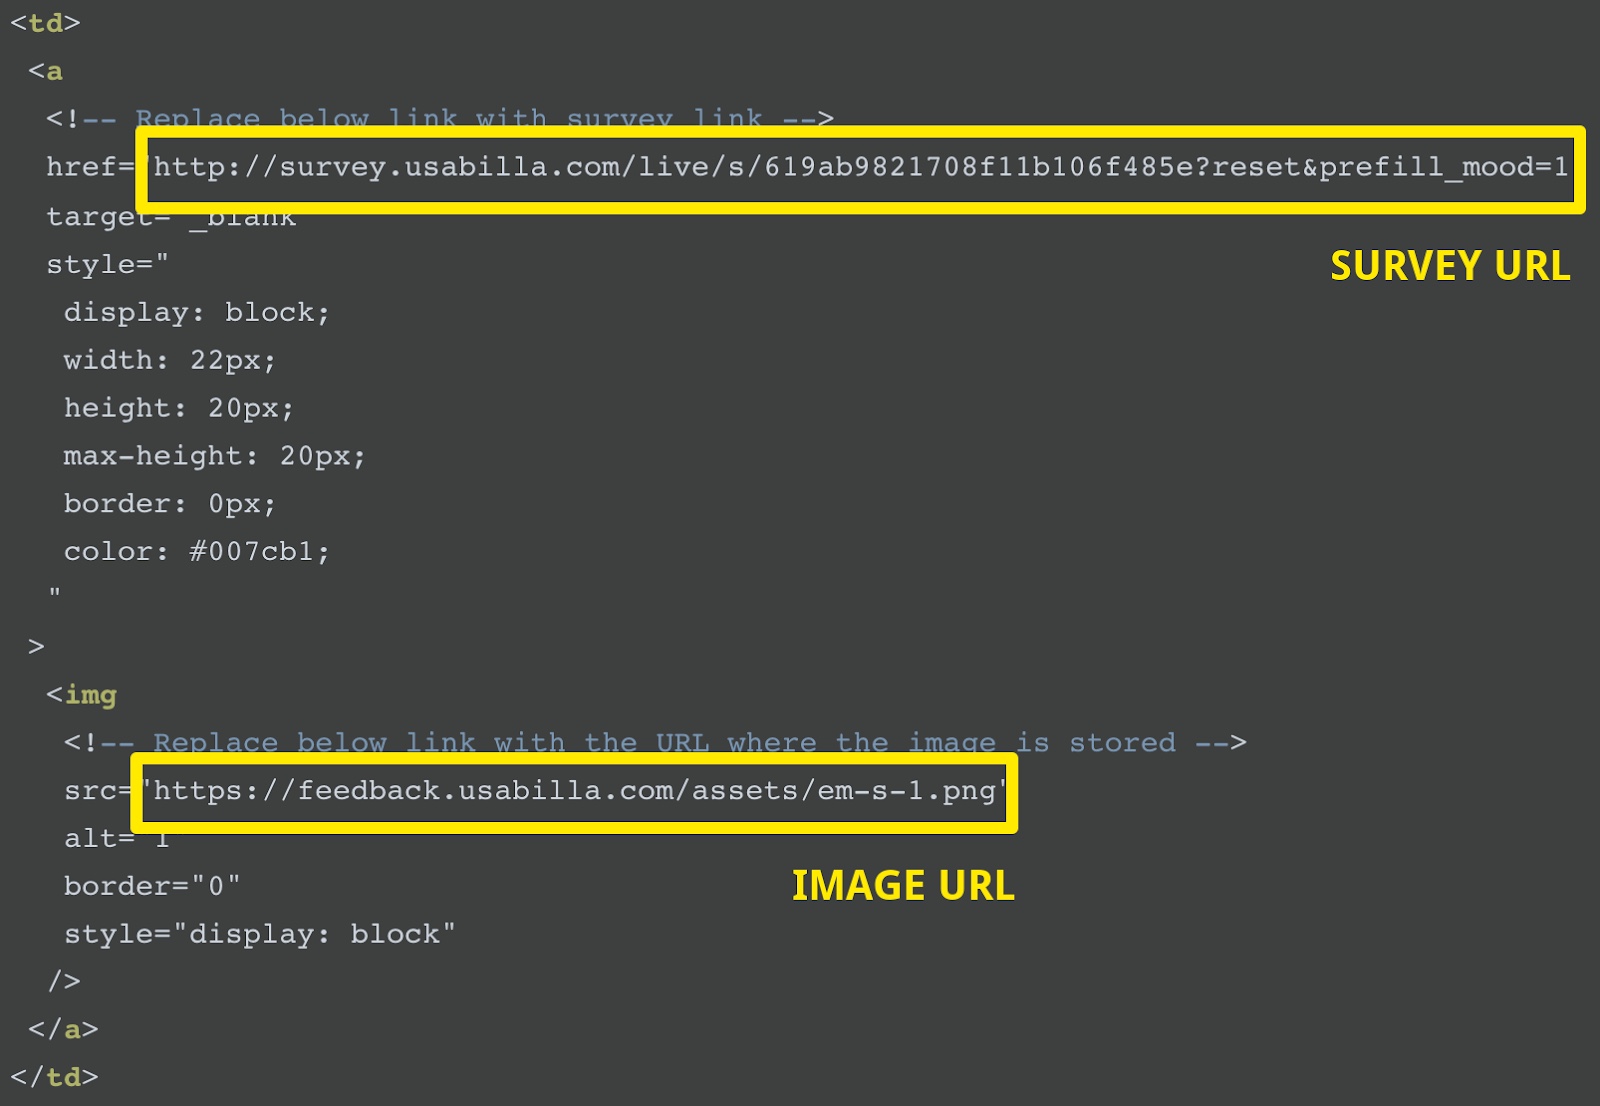
Alternatively, you can use this HTML snippet as the template which creates an embedded email form.
<a
 style="color: #000"
><b>We'd love your input</b>
</a>
<table
 style="border-collapse: collapse; border-spacing: 0px"
 cellpadding="0"
 cellspacing="0"
>
 <tr>
  <td>
  <!-- Replace the value of the below href attribute with survey
link -->
   <a
    href="http://survey.usabilla.com/live/s/619ab9821708f11b106f485e?
reset&prefill_mood=1"
    target="_blank"
    style="
     display: block;
     width: 22px;
     height: 20px;
     max-height: 20px;
     border: 0px;
     color: #007cb1;
    "
   >
    <!-- Replace value of the below src attribute with the URL where
 the image is stored -->
    <img
     src="https://feedback.usabilla.com/assets/em-s-1.png"
     alt="1"
     border="0"
     style="display: block"
    />
   </a>
  </td>
 <td>
  <!-- Replace the value of the below href attribute with survey
link -->
  <a
   href="http://survey.usabilla.com/live/s/619ab9821708f11b106f485e?
reset&prefill_mood=2"
   target="_blank"
   style="
    display: block;
    width: 22px;
    height: 20px;
    max-height: 20px;
    border: 0px;
    color: #007cb1;
   "
  >
   <!-- Replace value of the below src attribute with the URL where
the image is stored -->
   <img
    src="https://feedback.usabilla.com/assets/em-s-2.png"
    alt="2"
    border="0"
    style="display: block"
   />
  </a>
 </td>
 <td>
  <!-- Replace the value of the below href attribute with survey
link -->
  <a
   href="http://survey.usabilla.com/live/s/619ab9821708f11b106f485e?
reset&prefill_mood=3"
   target="_blank"
   style="
    display: block;
    width: 22px;
    height: 20px;
    max-height: 20px;
    border: 0px;
    color: #007cb1;
   "
  >
   <!-- Replace value of the below src attribute with the URL
where the image is stored -->
   <img
    src="https://feedback.usabilla.com/assets/em-s-3.png"
    alt="3"
    border="0"
    style="display: block"
   />
  </a>
 </td>
 <td>
  <!-- Replace the value of the below href attribute with survey
link -->
  <a
   href="http://survey.usabilla.com/live/s/619ab9821708f11b106f485e?
reset&prefill_mood=4"
   target="_blank"
   style="
    display: block;
    width: 22px;
    height: 20px;
    max-height: 20px;
    border: 0px;
    color: #007cb1;
   "
  >
   <!-- Replace value of the below src attribute with the URL where the
 image is stored -->
   <img
    src="https://feedback.usabilla.com/assets/em-s-4.png"
    alt="4"
    border="0"
    style="display: block"
   />
  </a>
 </td>
 <td>
  <!-- Replace the value of the below href attribute with survey
link -->
  <a
   href="http://survey.usabilla.com/live/s/619ab9821708f11b106f485e?
reset&prefill_mood=5"
   target="_blank"
   style="
    display: block;
    width: 22px;
    height: 20px;
    max-height: 20px;
    border: 0px;
    color: #007cb1;
   "
  >
   <!-- Replace value of the below src attribute with the URL where the
 image is stored -->
   <img
    src="https://feedback.usabilla.com/assets/em-s-5.png"
    alt="5"
    border="0"
    style="display: block"
   />
  </a>
 </td>
</tr>
</table>
Each answer option consists of a <a> and <img> tag. The <a> tag contains the survey link while the <img> tag contains the link to where the specific emoticon is hosted. You'll need to replace the survey URL for each answer option in the <a> tag.
As for the <img> tag, you'll only need to replace the link there if you'd like to use your own images, in which case you'll need to host them on your end, obtain the URL where they're hosted and then replace the uRL found in the example code with those URLS.
Once you have your HTML with all of your links added, you can copy the whole script and paste it in your email client.
Viewing Survey Responses
To view your survey and responses:
- In the top left corner of the app, select Email, then select Websites from the dropdown.
- Under Campaigns, select Overview.
- To view responses, select Results on your survey.