Apply
Form Builder: Overview
The Form Builder will be an essential part of your program workflow if you are going to be designing custom forms with questions in your site. This article will walk through the various sections of the Form Builder and different actions you can take within the Form Builder.
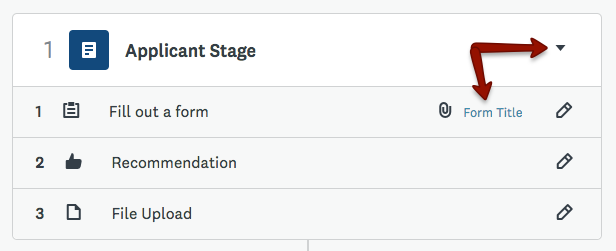
How to Access the Form Builder
To access the Form Builder:
- Go to the Workflow
- Click on the dropdown arrow to the right of the stage
- Click on the Attached form to the task you are trying to edit
How to Add a New Question
Adding questions to your form is how you will build your form(s). You can add questions in two ways.
To add a question to the middle of the page:
- Click on the Questions tab on the left side of the Form Builder
- Click and Drag the question type you wish to add and place it wherever you need to within the page you are on.
To add a question to the end of the page:
- Click on the Questions tab on the left side of the Form Builder
- Double Click on the question type to have it added to the very end of the page you are on.
Form Title and Description
The Form Title is what your users see when they enter the form. This is different from the Task Name which the users will view when they are in the main application page.
Edit the Form Title
When a form is first created, the form title inherits the form name. However, if you wish to edit it:
- Click on the edit icon next to the form title.
- Enter the new title you wish to give within the Title field.
- Click anywhere on the page to save the changes.

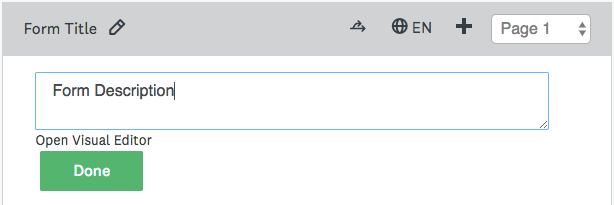
Add/ Edit the Form Description
The Form Description can be extremely useful if you wish to provide details and instructions to your applicants in regards to the steps they need to take to complete the form. Commonly administrators will also enter their own contact details in case an applicant has any questions while filling out the form.
To add or edit the Form Description:
- Click Edit Description.
- Enter the description you wish to add to the form.
- Optional: Click Open Visual Editor to customize the styling of the form description.
- Click Done.
NOTE: If you have multiple pages in the form, the Title and Description will appear at the top of every page.
Form Title Restriction
The initial form title when creating the form cannot be longer than 50 characters when creating the task. Change it later to include:
- More than 50 characters
- HTML
- CSS
HTML can be entered directly into the Title and Description fields and it will be observed within the live version of the form.
How to Save your Form
Saving your form is required for your changes to be visible to users when they enter the form.
There are three ways in which your form is saved:
- Draft Saved automatically
- Clicking the Save Button but remain in the form
- Click Save & Close to return to your Workflow
NOTE: Changes saved as drafts (auto-saved) will not be visible to other users completing the form until Save or Save & Close has been selected.
How to Preview your Form
Click on Preview will open a new tab where you can test your form.

The form will appear almost exactly as it would to your user. Since you are previewing the form as an administrator, you will also see any Hidden Questions or JavaScript Questions; however, these will not be visible to your regular applicants.
NOTE: If your form contains Piping Variables used to pipe information from another form, or to pipe information specific to the user, these piping variables will not work correctly within the preview and the field will appear blank. If you wish to test your Piping Variables we would recommend using a test application. For more information in regards to this you can refer to How to Test your SM Apply Site: Testing Forms.
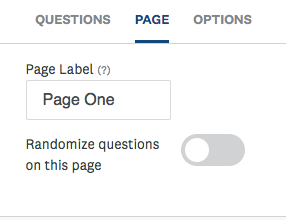
How to Add a Page Label
By default, pages are labelled by "Page #" based on the page placement in the form.

Page labels allow you to create named pages of your form that can then branch or jump users to. Page labels do not have a character type restriction, eg., #@!&$%, or character limit.
To change the page title:
- Click on the Page tab within the form’s editor.
- Under "Page Label" input your new page title. The new name will apply to that page.
- Repeat this step for each page.
TIP! Use Page Labels if each page in your form will have a different purpose, for example, Contact Information, Educational Information, Budget, etc.
How to use the Bulk Editor
In the case that you have a long list of choices or variables, or a list that you'll be re-using often throughout your many forms, it may be useful to use the bulk editor. The bulk editor converts lists into choices/variables/rows while giving you the option of saving them for use on any future question. The Bulk option is available under all "Choices" and "Variables" on the left-hand floating editor box.

| Section | Description |
| Load Preset | Select from 1 of 23 available presets. |
| Save a Preset | If a preset is not available, you can create one for later use. |
| Editor | You can edit a preset after the fact. However, any changes made will not save unless it is as a custom preset. |
Additionally, you can also save custom bulk lists. To create a custom bulk list:
- Click on the “Bulk” button when adding choices, variables, rows or columns to a question.
- Once the dialogue appears, write or paste your list into the text field. Make sure that each item in the list is on a separate line.
- Enter a name for your list and click Apply.
Save a Custom Preset
| Section | Description |
| Custom Preset | Enter the name of the present you'd like to use. |
| Preset Choices | Information typed into here will save in the custom preset. Note that, despite the fact it is preset you can still alter it after the fact. |
How to use the Visual Editor
The visual editor allows you to add text, videos, links, and more to your form. The editor is available in the Question Titles, and Form and Question Descriptions, but not for the Form Title, Choices or Variables.
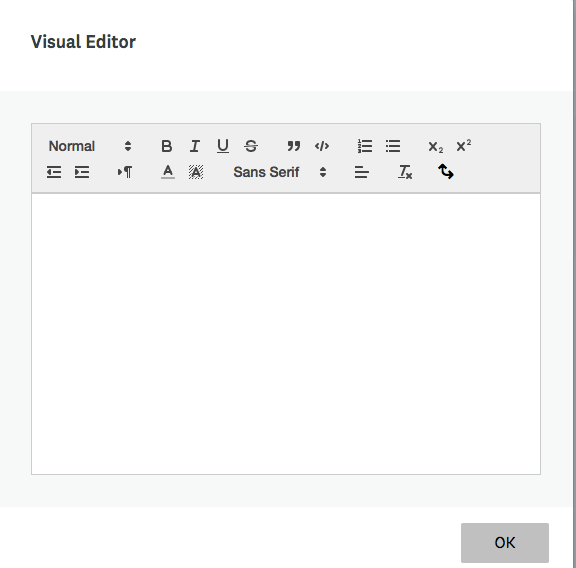
To access the visual editor:
- Click on the question you wish to edit
- In the Options tab, click on the question title or extra description text box
- Click on the Open Visual Editor button beneath the text box.
- Edit your text using the options available in the visual editor.
- Click OK.
Click the Source button within the visual editor to input HTML or CSS. While Javascript can be placed in the source, we recommend that you place it in a JavaScript question type instead so that you can find it easily if you need to revisit the form in the future.