Apply
How to Archive Tasks to Preserve Collected Data
The purpose of this documentation is to outline the steps you will need to take in order to archive a form within your Workflow. Some of the main reasons you may wish to archive a form would be:
- It is no longer relevant to your workflow
- It is no longer relevant to your workflow and you wish to replace it with a new form
- You want to make major changes to the form, but wish to preserve the data you have collected
Editing a Live Form
When editing a form that is live in the site you will notice the following warning appear before you can make an action:
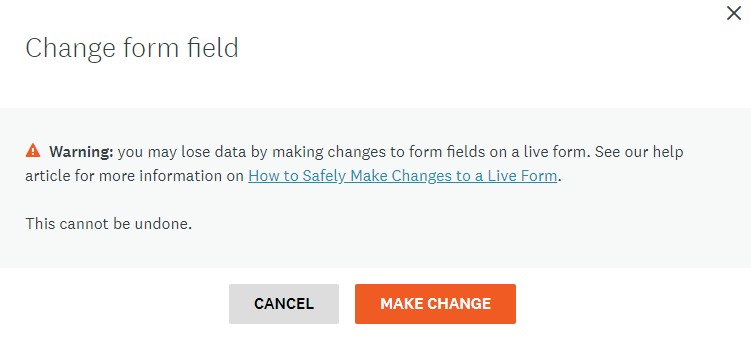
This warning appears because when a user responds to a question within a form, the responses they give are stored within that form and more specifically to the question they responded to. Therefore, when pulling reports and viewing the forms, the responses you have collected are associated to the question.
Altering the form, such as removing questions, or adding or removing options from a dropdown or checkbox type question can skew the data. For example if you remove a question from a form, the answers that have been given to that question will be removed from the system. You can find more information on what you can and cannot edit within a form here: How to Safely Make Changes to a Live Form
Archiving Tasks
These steps will walk you through how to Archive a task in your workflow, they can be used if:
- It is no longer relevant to your workflow
- It is no longer relevant to your workflow and you wish to replace it with a new form
How to Archive your Task
- Add a new stage: We call this the "Graveyard" or "Archive" Stage. This stage will be used to store your old task(s) within the Workflow. It can be placed at the end of the workflow.
- Move your task: Hover your cursor over the task you wish to archive to show the More Options icon and select 'Move to stage' to choose your new 'Graveyard/Archive' stage from the dropdown.

- Create a new task: In the instance that you would like to replace it with a new form, you can now Create your new task within the workflow.
Making Major Changes to a Form
These steps will walk you through how to Archive a task in your workflow if:
- You want to make major changes to a form, but wish to preserve the data you have collected
In order to be able to make major changes to a form, we suggest duplicating the task and making changes in a new version of the form. This way the responses given to the previous version will remain intact and you can still make changes to the form. In order to do this:
- Add a new stage: We call this the "Graveyard" or "Archive" Stage. This stage will be used to store your old task(s) within the Workflow. It can be placed at the end of the workflow.
- Duplicate the task: The duplicated task will have the original task name with (copy) beside it. If your task is a form task, the form will also be duplicated
- Move your Task: hover your cursor over the original task in the stage to show the More Options icon and select. Now select Move to Stage to choose your new 'Graveyard/Archive' stage
TIP! We suggest changing the name of this task slightly so that you can easily identify it from new tasks when pulling reports and creating triggers.
- Update Automations: Now that the new task has been created, you will be able to see it within the Stage your old task used to be in. You will now need to update any automations that you had connected to the old task so that applicants can still flow properly through your workflow.
- Edit New Form: Now that the above steps are complete, you can now go into the new form and make the necessary changes. It will look identical to the old one, however, the previous information will be preserved and future applicants will fill out the application using the new form and questions.